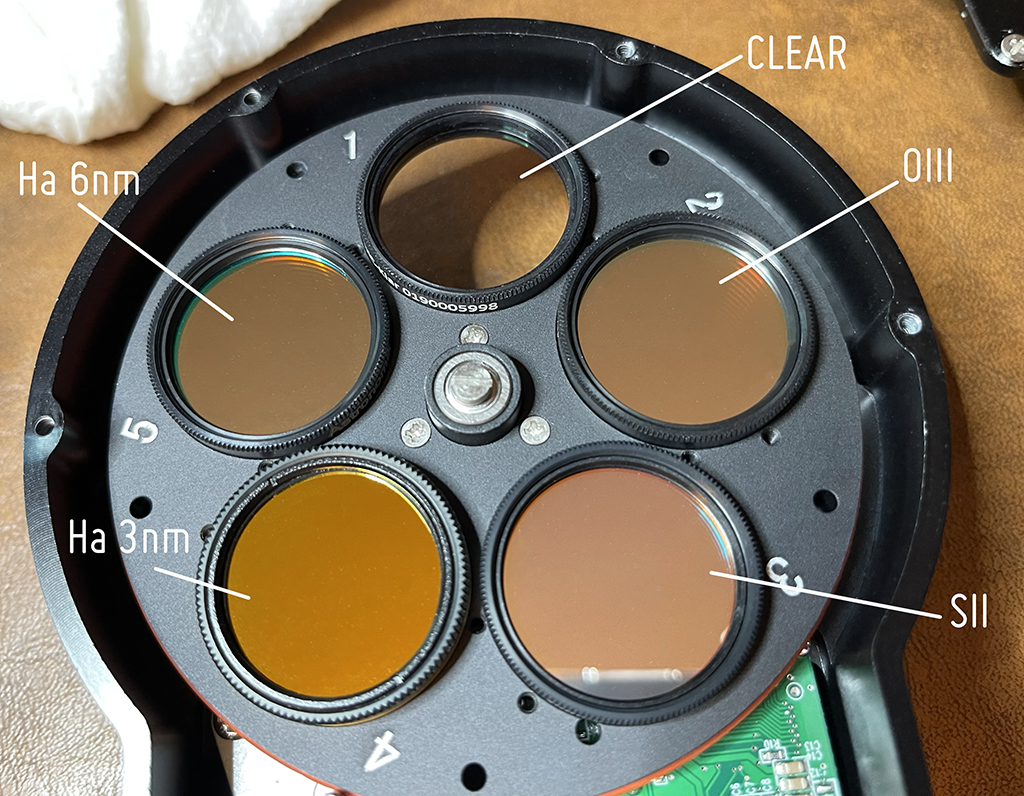
ZWO EFW Update
Added the Antlia 3nm Hydrogen-alpha filter in the ZWO filter wheel, and took a pic, added labels to make sure I remember where the filters are. Before this switch-up I had two near-infrared filters (a 680nm and 850nm) in slots 4 and 5, with my Astronomik 6 nanometer Ha filter in the first position. And just to make things as uncomplicated as possible I have the OIII (Oxygen 3) filter in position 2, and SII (Sulfur 2) in 3.
Posted September 4, 2021
Testing the Narrowband Rig with the New OTA
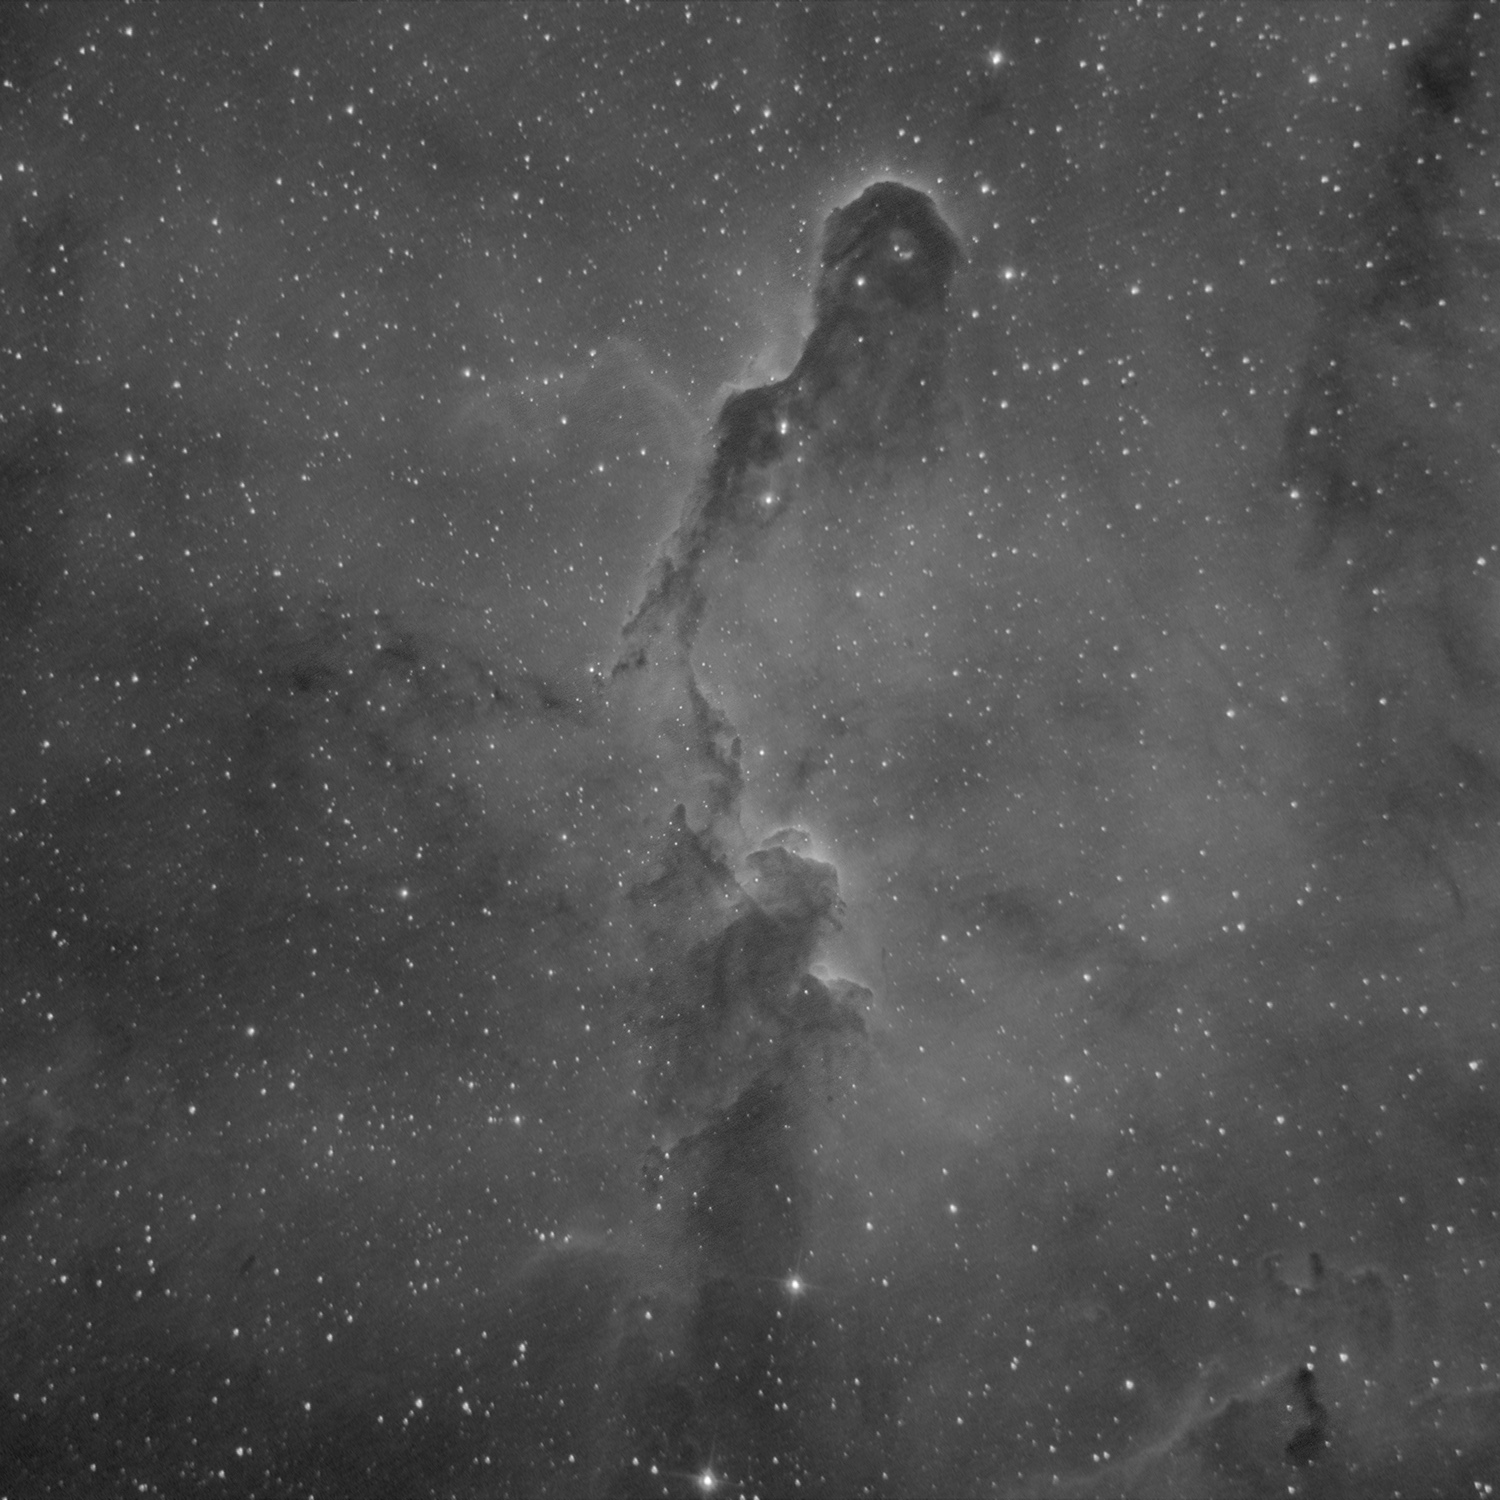
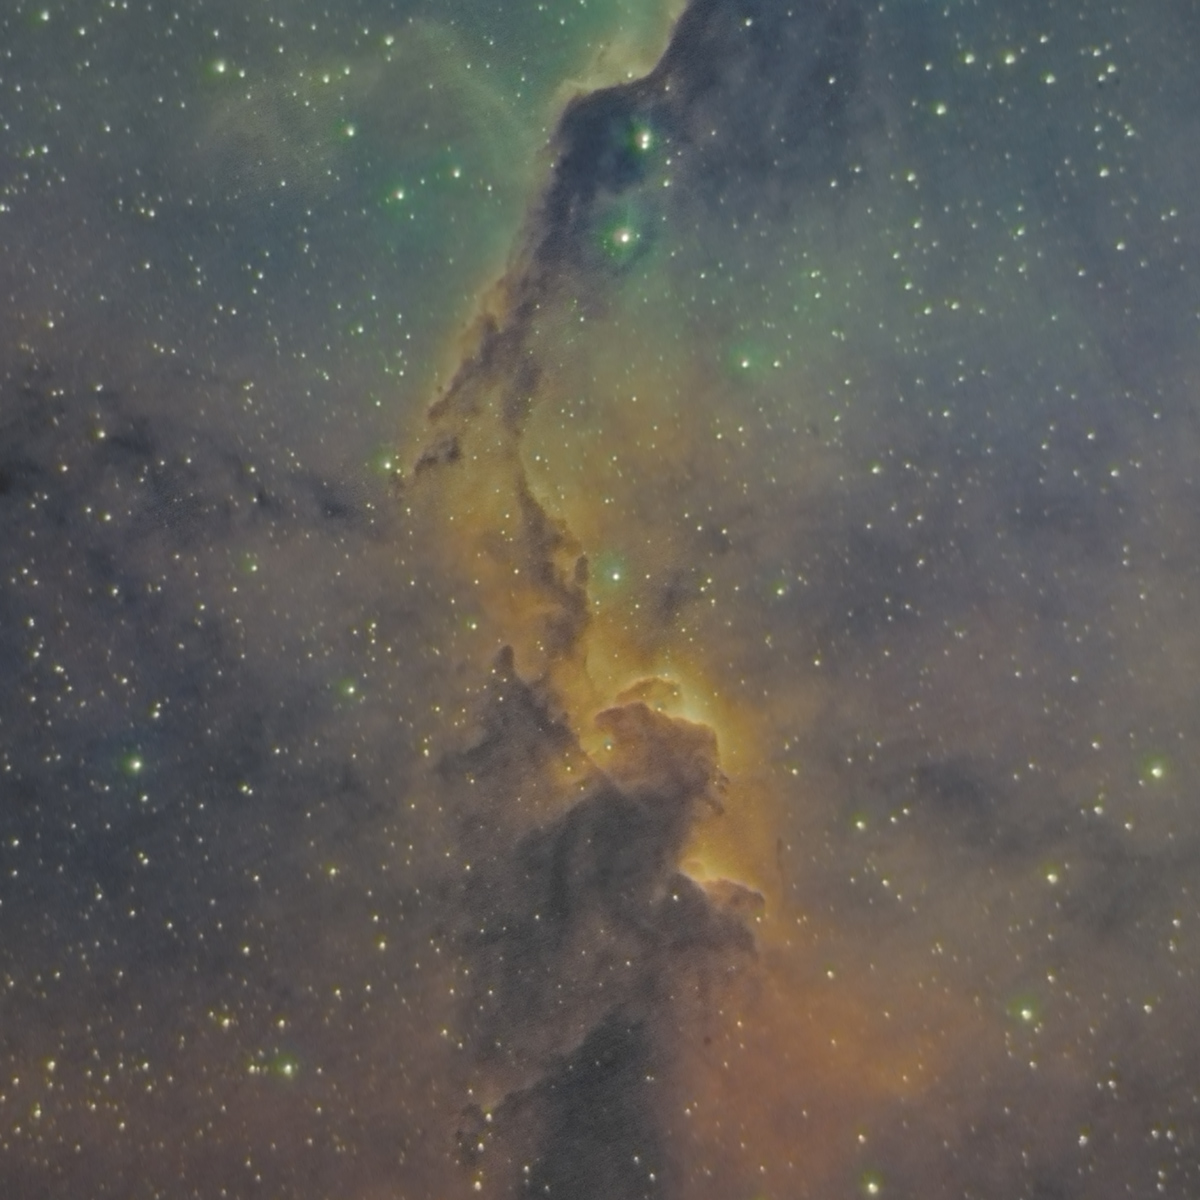
First narrowband test with the new Apertura Newtonian scope, although it was barely a test—31 sub-exposures in Ha before the clouds started rolling in, and with a very bright full moon in the sky. IC 1396 is a large (3 degrees in diameter) emission nebula and star-forming region in the constellation Cepheus, about 2400 lightyears away. Within IC 1396 is the Elephant's Trunk Nebula catalogued as IC 1396A, pictured here in hydrogen-alpha (narrowband). This structure is well over a hundred trillion miles long (roughly 20 lightyears), so if you want to get from the top to the bottom you'd better have a pretty fast vehicle.
Notes: 31 x 240 second subs in Ha. Apertura 8" Newtonian 880mm FL at f/4.4, ZWO ASI1600MM-Pro monochrome camera, Astronomik 6nm Hydrogen-alpha filter, SkyWatcher EQ6-R Pro mount, controller: INDI/Ekos/KStars. I managed to capture 31 subs of IC1396A, but no calibration frames—that's only half the subs I would normally want for this one in Hydrogen-alpha. I was not dithering here either, which is something I normally have on, and the result is some "walking noise" which is pattern noise in one direction--top-right to bottom left, in this case, introduced either by polar alignment drift or differential flexure between the guide scope and the OTA (this is the most likely suspect here, but not absolutely sure). Guiding total RMS averaged around 1 arcsecond the whole time, not the best, but I attributed it to the full moon, lack of contrast, but who knows. I didn't see any walking noise with the color rig, but even so, I'm going to go with off-axis guiding next time th eskies clear and see what happens!
Clouds swept in around midnight, and then it rained through the night, so I took what I could get and did some mild processing. There's serious coma around the edges. I have the stars pretty well dialed in with the color train, but not here. I have some measuring and caliper work to do!
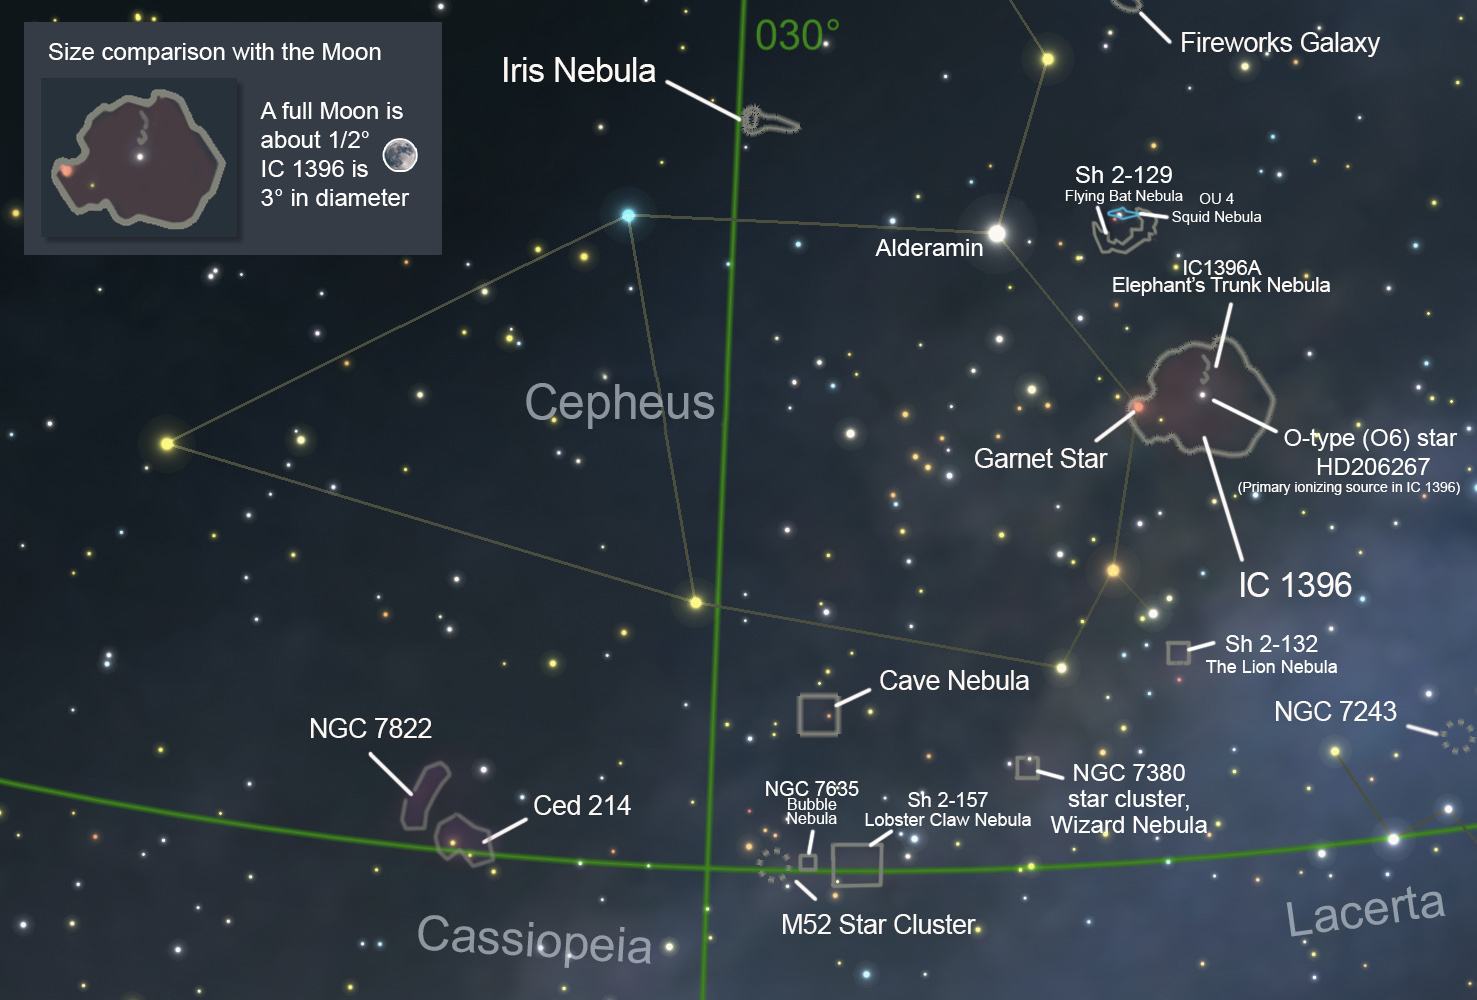
The area around the constellation Cepheus is an astrophotography buffet, and because the constellation is circumpolar, it's in the night sky for at least half the year—if you're anywhere near the north. Both the Iris Nebula and the Fireworks Galaxy, two amazing deep sky objects I captured last week, are here, along with the Elephant's Trunk nebula, Cave and Wizard nebulas—and a lot more! Some of these targets span the border with Cassiopeia at the bottom.
BiColor version of the central region of the Elephant's Trunk Nebula--Hydrogen-alpha and Oxygen 3:
Posted June 25, 2021
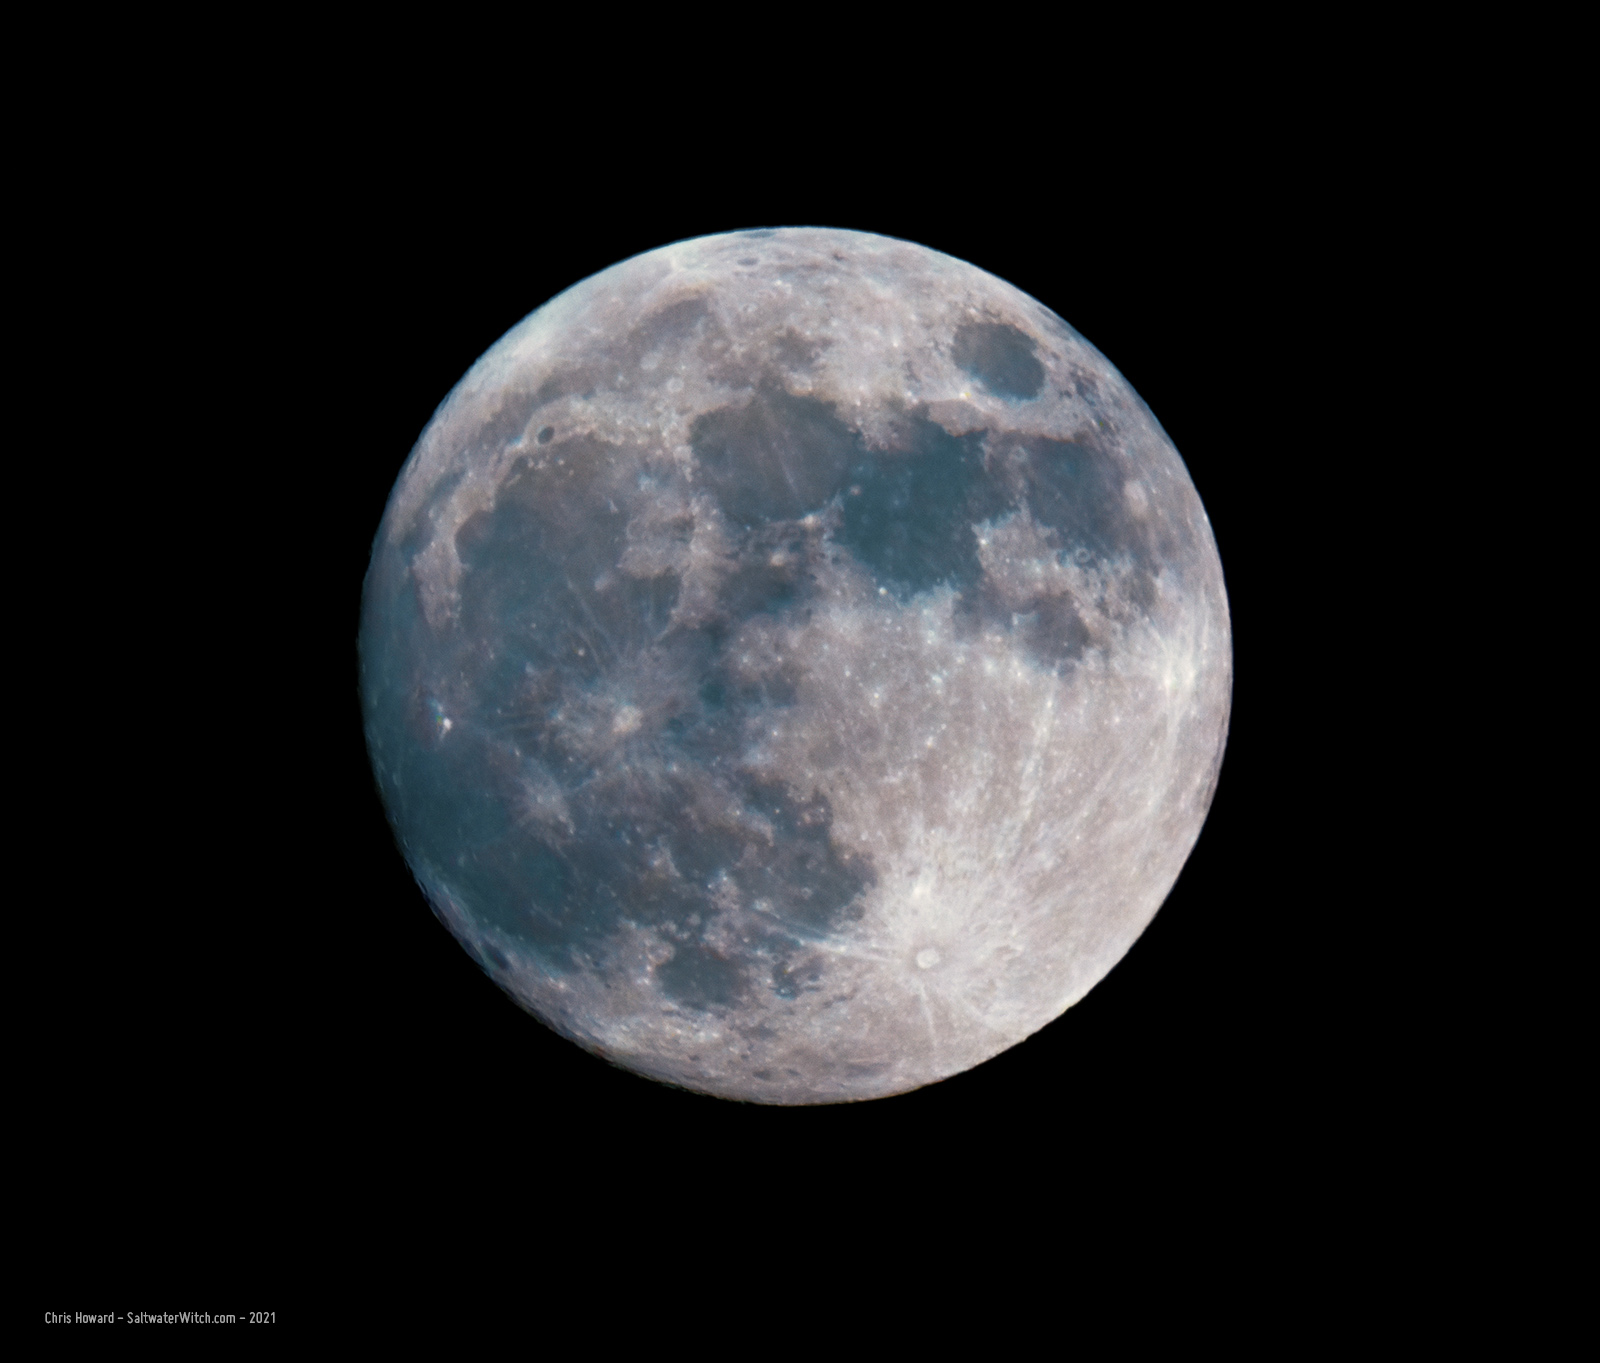
Our moon
There's a beautiful moon out there tonight! Nikon D750, AstroTech AT6RC 1350mm f/9, 1/2500 sec exposure.
Posted June 23, 2021
What is deep sky astrophotography anyway?
What actually happens when we take a long exposure image of a deep sky object like a nebula?
The short answer is we capture light, like any other kind of photography. That's what the sensors in our cameras are designed to do. During long exposure imaging of a nearby nebula, my astro camera is detecting millions of photons, individual particles of light, released thousands of lightyears away when the intense radiation from a star ionized the surrounding interstellar medium, mostly clouds of hydrogen. You often see these referred to as HII (H2) regions, which are massive clouds of ionized hydrogen. Our cameras detect the individual particles of light emitted by hydrogen atoms—that's deep sky astrophotography right there, in one line. What's happening at a detail level is a hydrogen atom, bathed in intense UV radiation from a star, loses an electron and becomes positively charged, which isn't stable. It then releases a photon (light) when it gains an electron and returns to a neutral state. This is the ionization process—continuous energetic state changes across clouds of hydrogen that span trillions of cubic kilometers, and this process goes on for billions of years. It's all photons, particles of light without mass, continuously shooting off in all directions, generated when hydrogen atoms return to their stable state. And some tiny fraction of those photons arrive at our little planet, go through the atmosphere above New Hampshire, through the telescope I have focused on a point in the sky to hit one of the millions of photo sites on the camera sensor (my monochrome camera has a 16 megapixel sensor—11.7 million pixels). So, if I say I'm shooting a four-minute exposure, it means the "shutter" is open for 240 seconds, capturing photons the whole time, and the number of photons striking each site or "pixel" is converted into a value that, when read out, represents the light and dark values and gradients in an image.
Meanwhile the earth is rotating rapidly, a degree every four minutes, and if I want the stars to look like stars and not streaks of light, I need to mount the telescope on a device that moves precisely with the rotation of the earth. But that's a whole other paragraph for another blog post.
Posted June 22, 2021
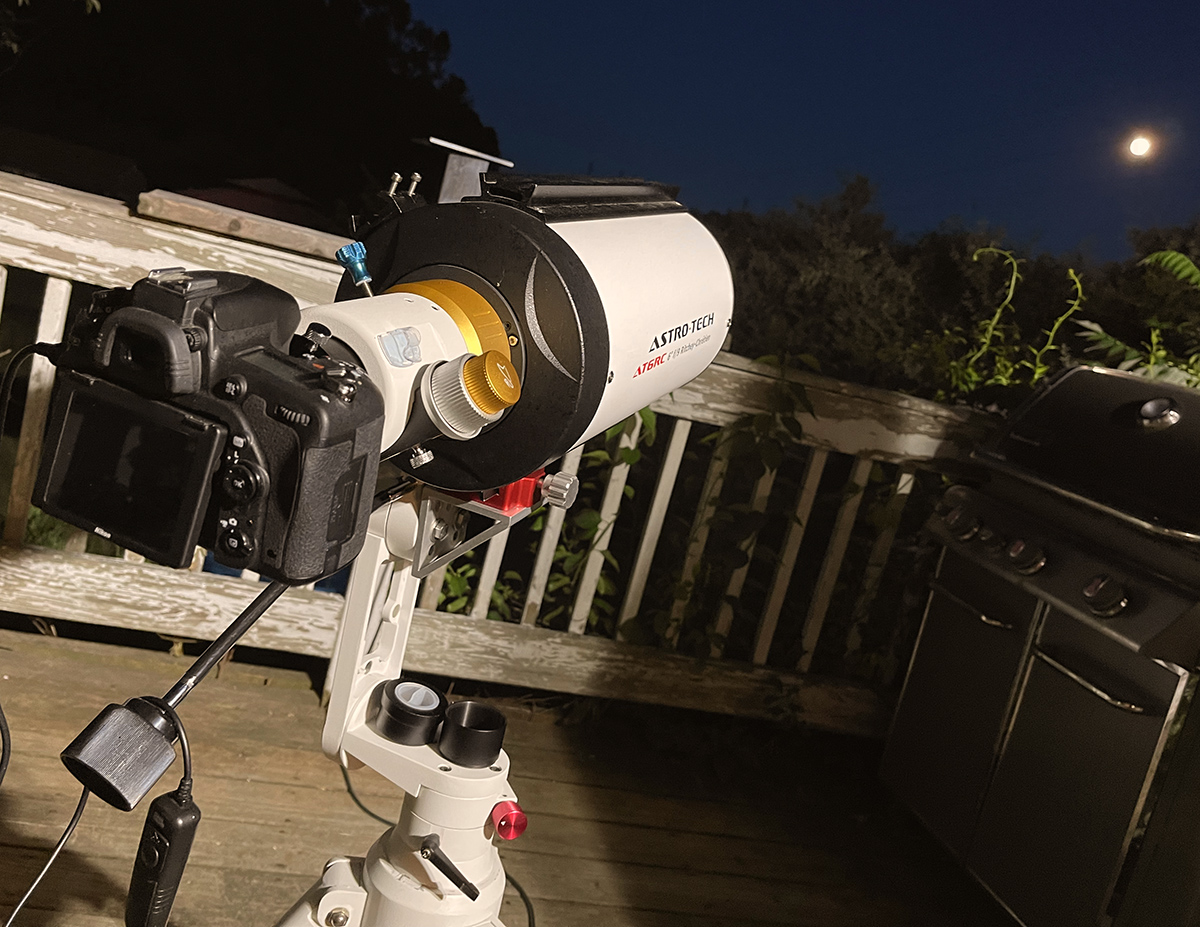
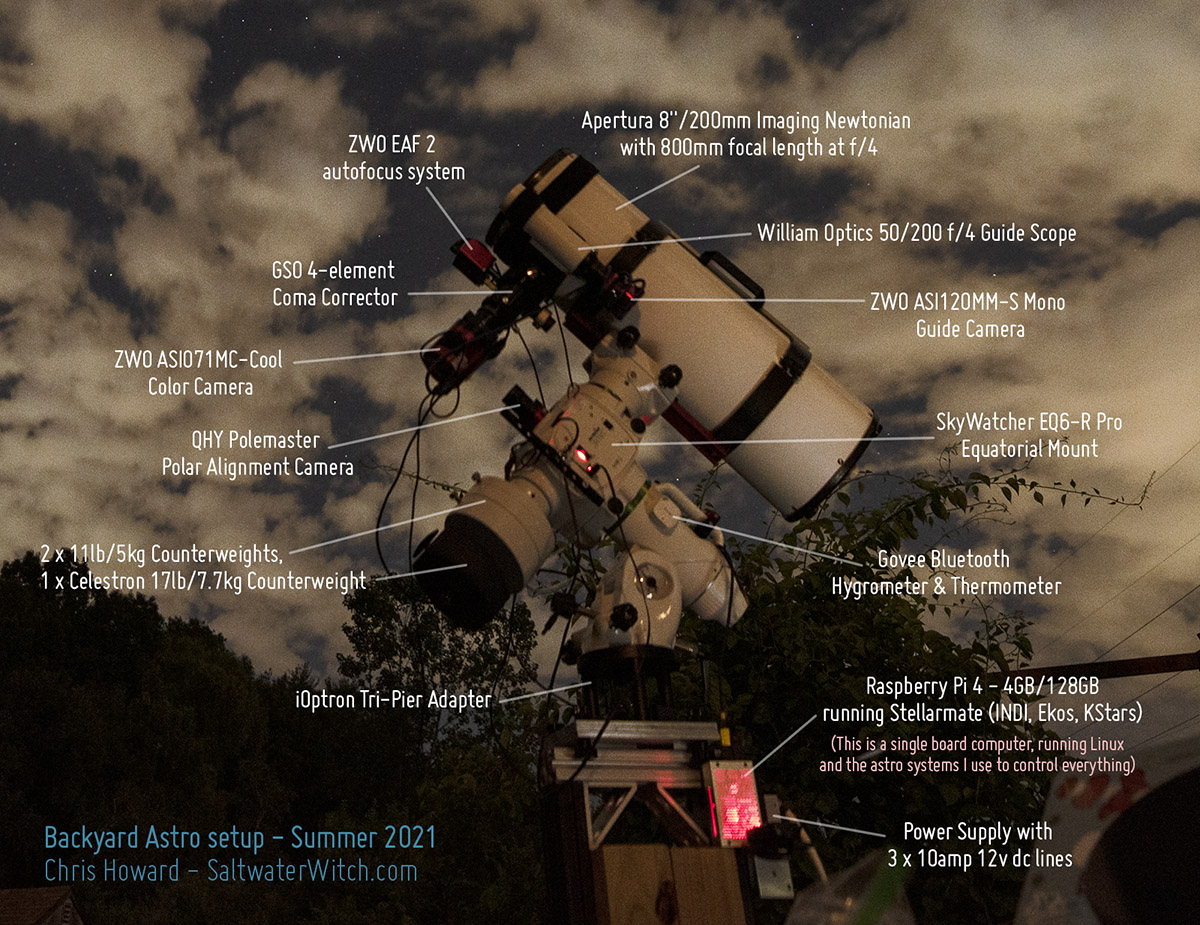
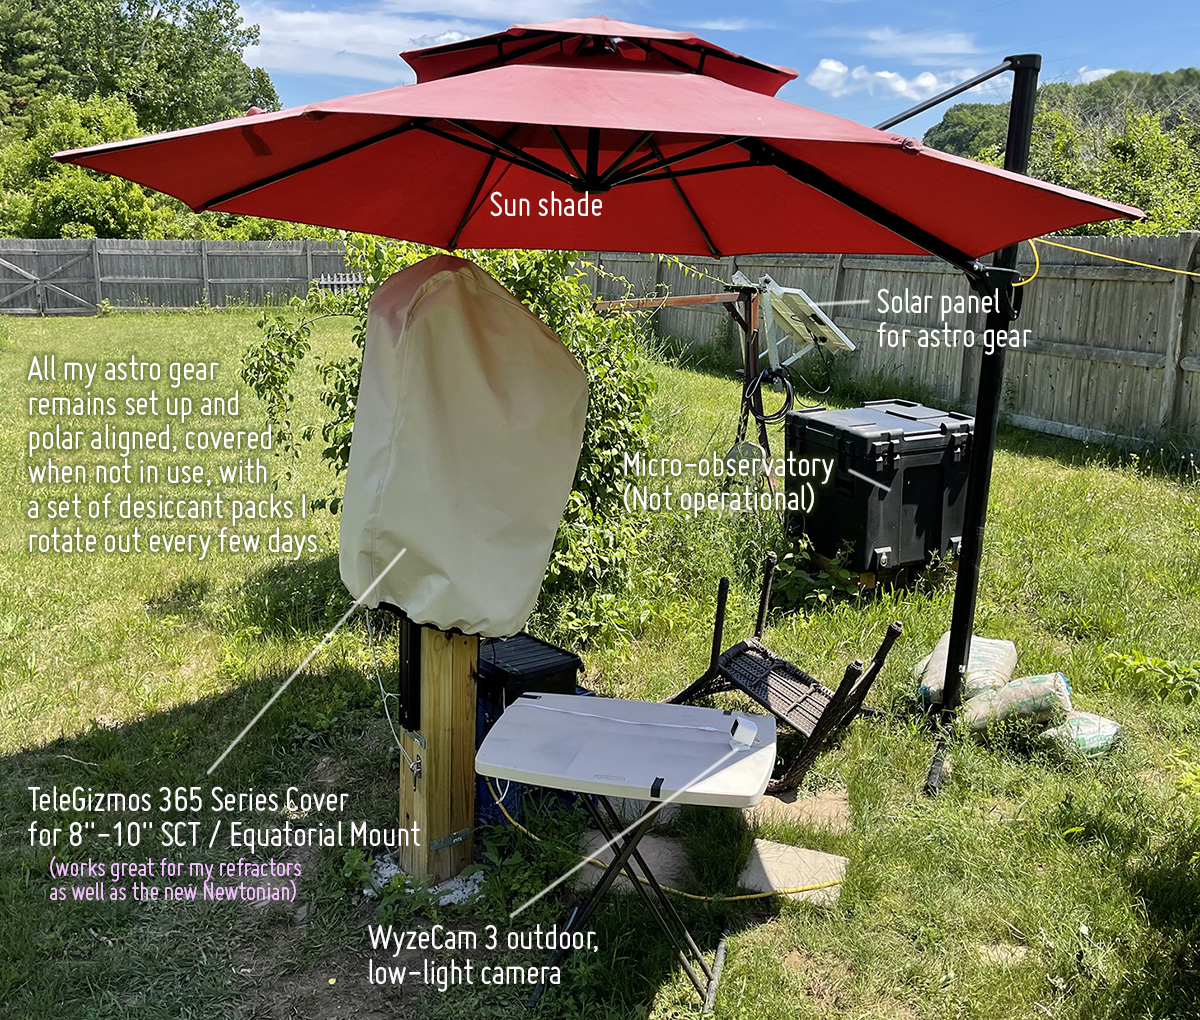
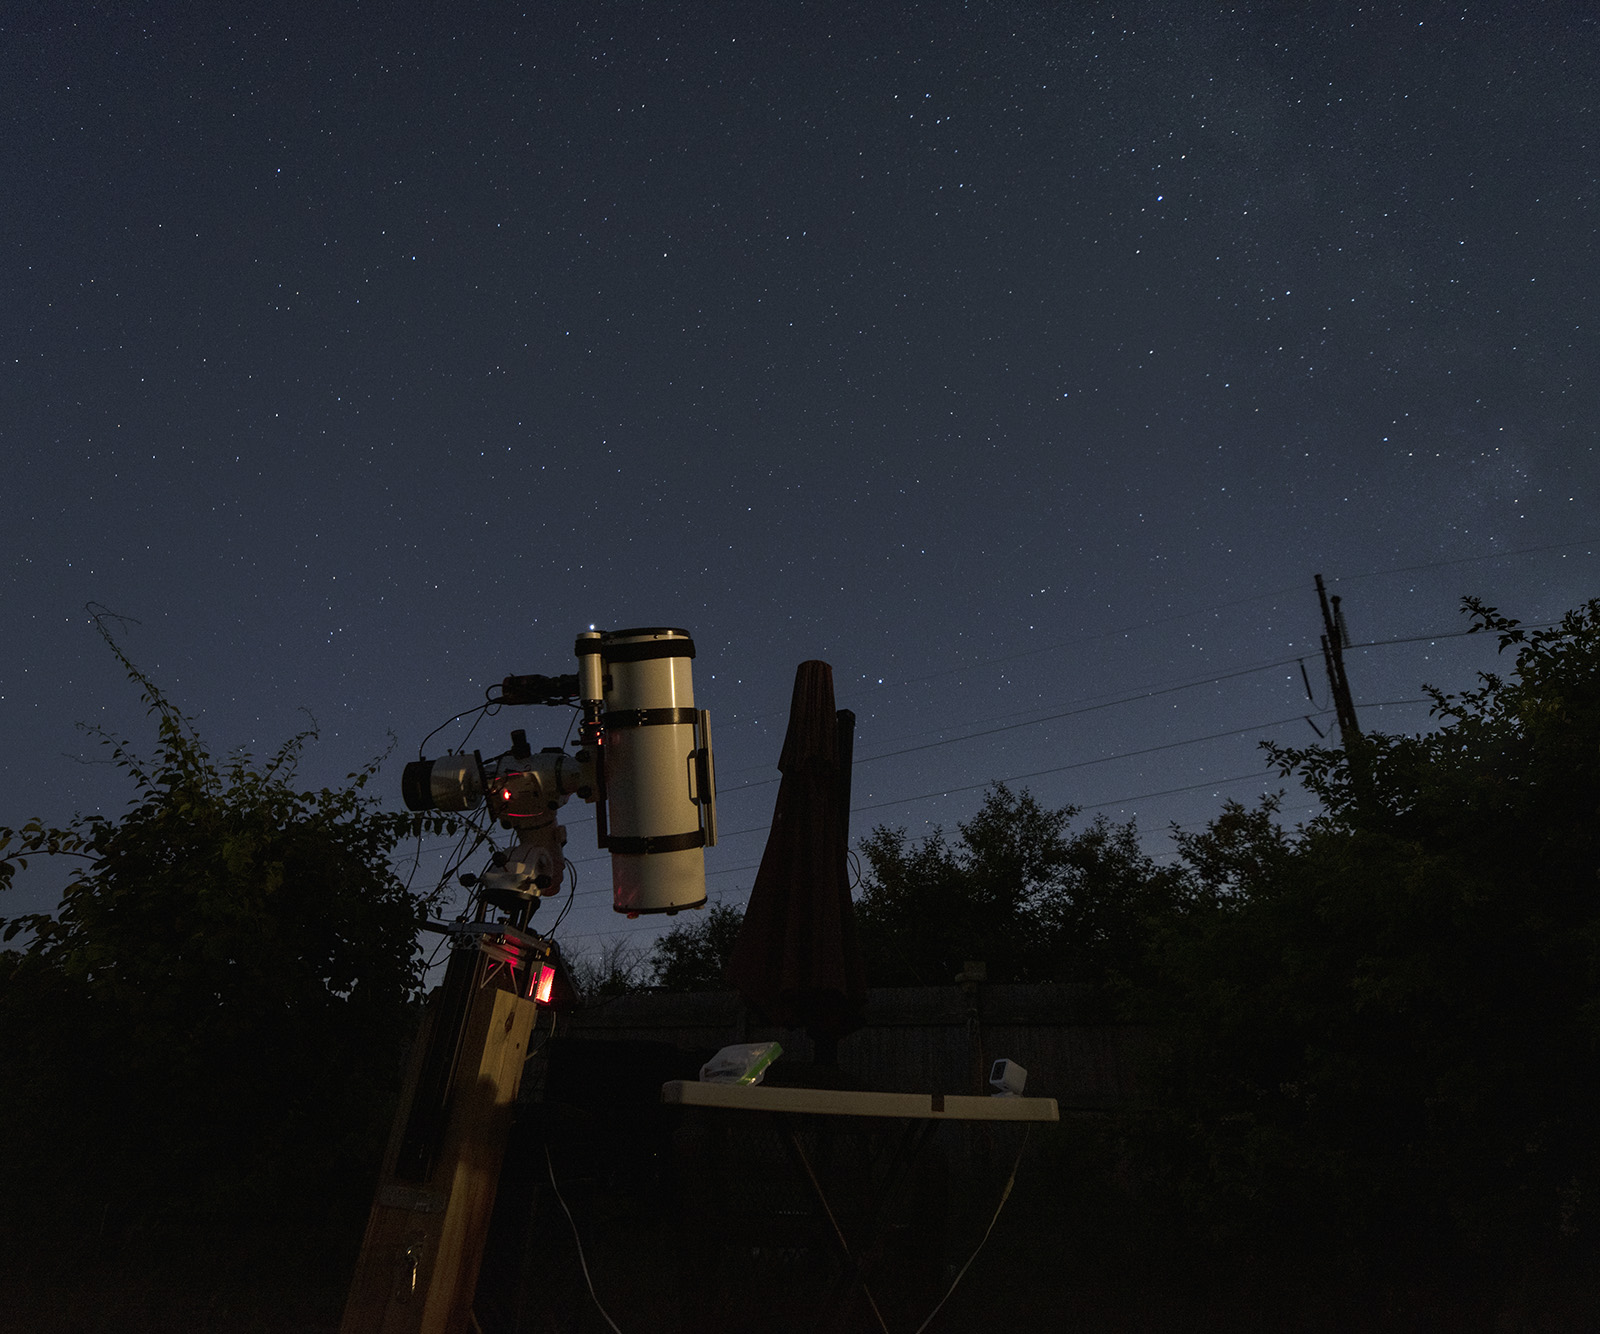
My Backyard Astro Setup - Summer 2021
This is the gear I currently have on the pier. I'm currently running with the color imaging train, and I will continue to until I get the coma correction dialed in. I'll try other cameras after that, including monochrome/narrowband.
Here's what things look like during the day. The micro-observatory project is on hold until I can buy a replacement for the CEM25P mount.
Posted June 19, 2021
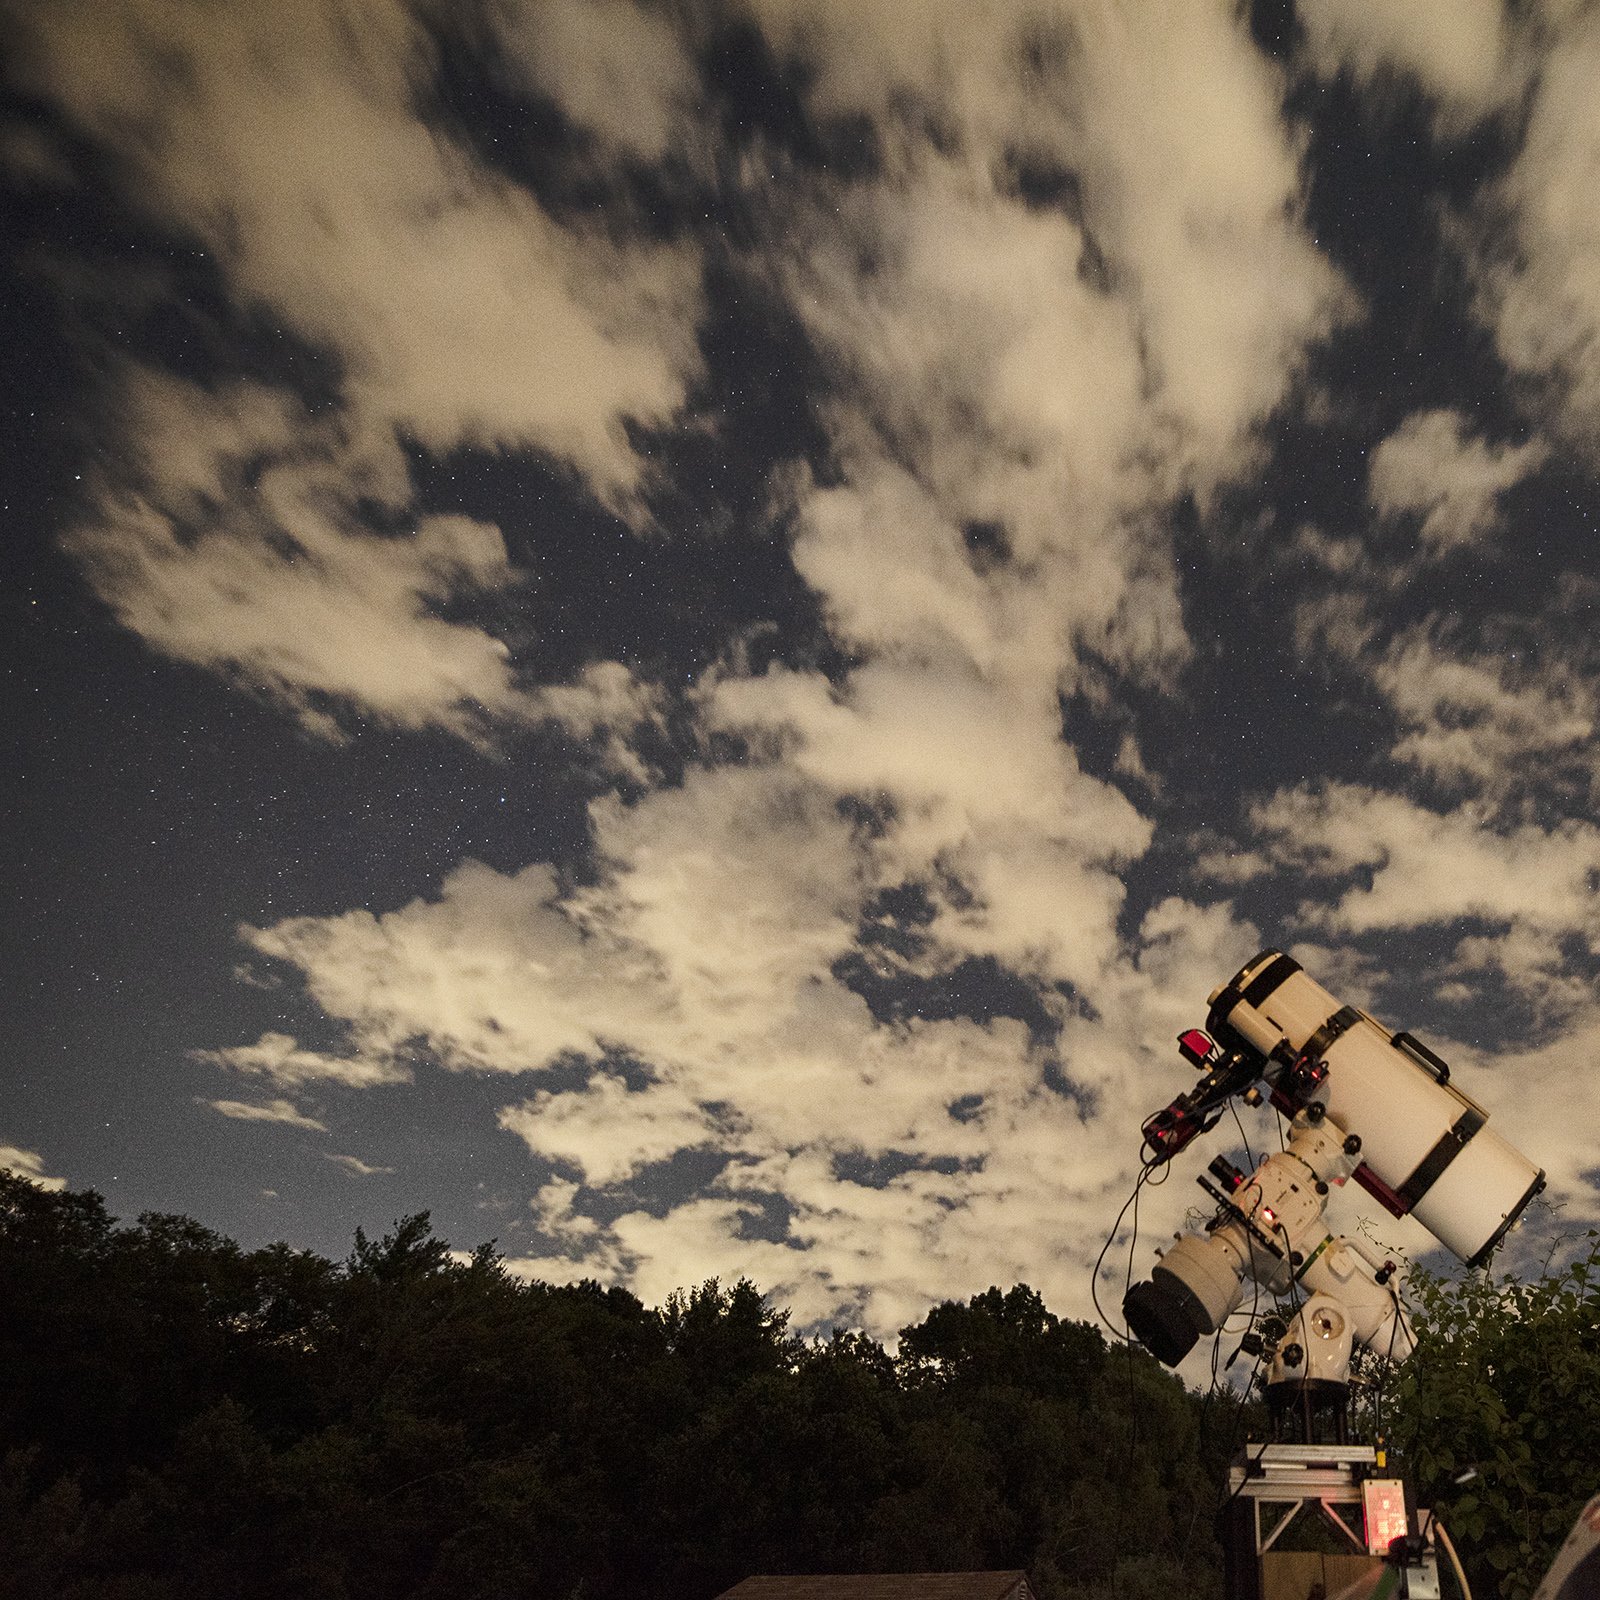
Waiting for the skies to clear
I shot this a couple nights ago with the Nikon D750 and Irix 15mm lens, all set up for the Iris Nebula, but couldn't get started until after midnight with these clouds sweeping through. See my last post for the Iris Nebula image.
Posted June 18, 2021
Second night out with the Apertura 8" Newt
I selected IC 5146, the Cocoon Nebula as a nice broadband color target for my second clear night with the Newt, and at 800mm focal length, the Cocoon should fit nicely in the frame, with room for the long trail of dust flowing away from it--if I can manage it.
Mechanics: the stars only look slightly better tonight, still wacky around the edges. They were a coma-induced mess last night, but I rearranged some of the imaging train and...it looks, well, not much better. But I'll get there. I am not the type to spend all night twiddling with spacers and digital calipers to calculate the correct back-distance and eliminate every last trace of coma. I'd rather image, and make small corrections along the way, even if it means the stars look like crap before I get things properly dialed in.
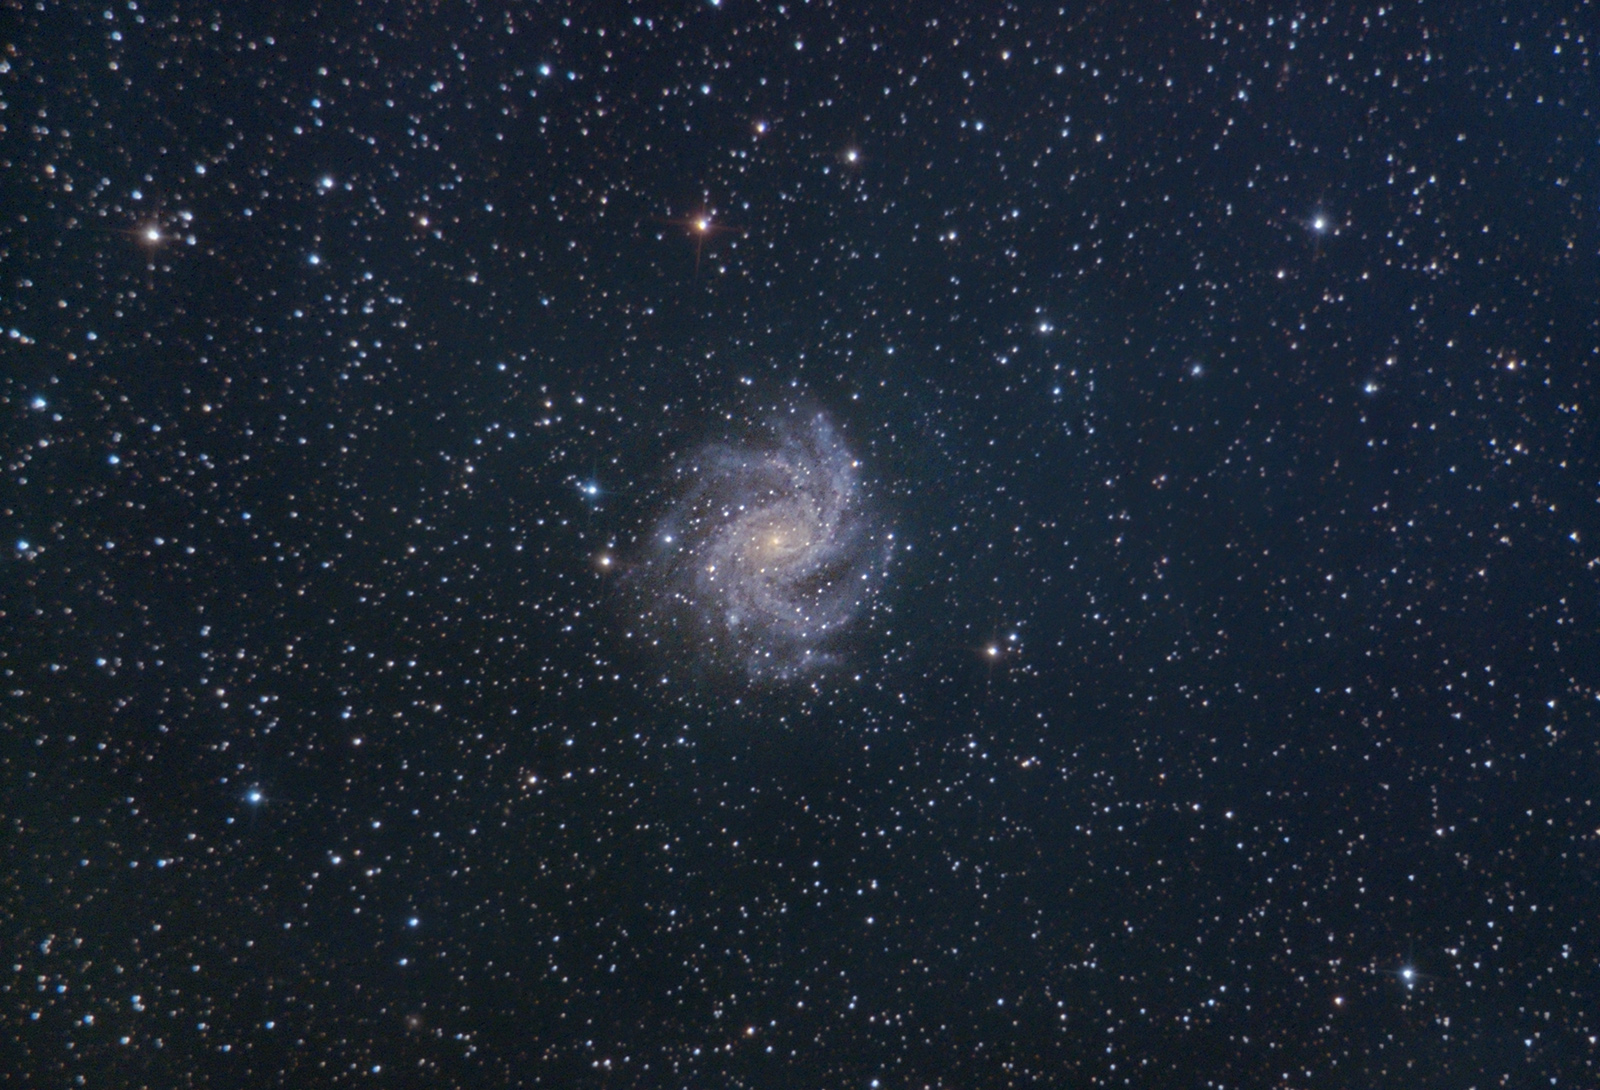
So, I was also looking for a nice target to shoot while the Cocoon climbed a bit higher in the sky, more than 30°, and I went for NGC 6946, Caldwell 12, the Fireworks Galaxy in Cepheus. I don't normally go for galaxies, unless they're relatively close by, but there are a few like M101 (Pinwheel Galaxy) and M81 (Bode's Galaxy) which are great targets if you're running with less than a 1000mm--other than the obvious ones like M31, M33, LMC, etc.
The Fireworks Galaxy is 22 million lightyears away. To put that distance in perspective, one lightyear is almost 6 trillion miles. I'll leave the multiplying by 22 million up to you. Fireworks is a medium-sized galaxy, about half the size of the Milky Way at about 40,000 lightyears across. It's a spiral galaxy, and it has the advantage, from our perspective, of being face-on, or is that top-down? Notes: 31 x 120 second subs, no filters.
NGC 6946, Caldwell 12, the Fireworks Galaxy in Cepheus:
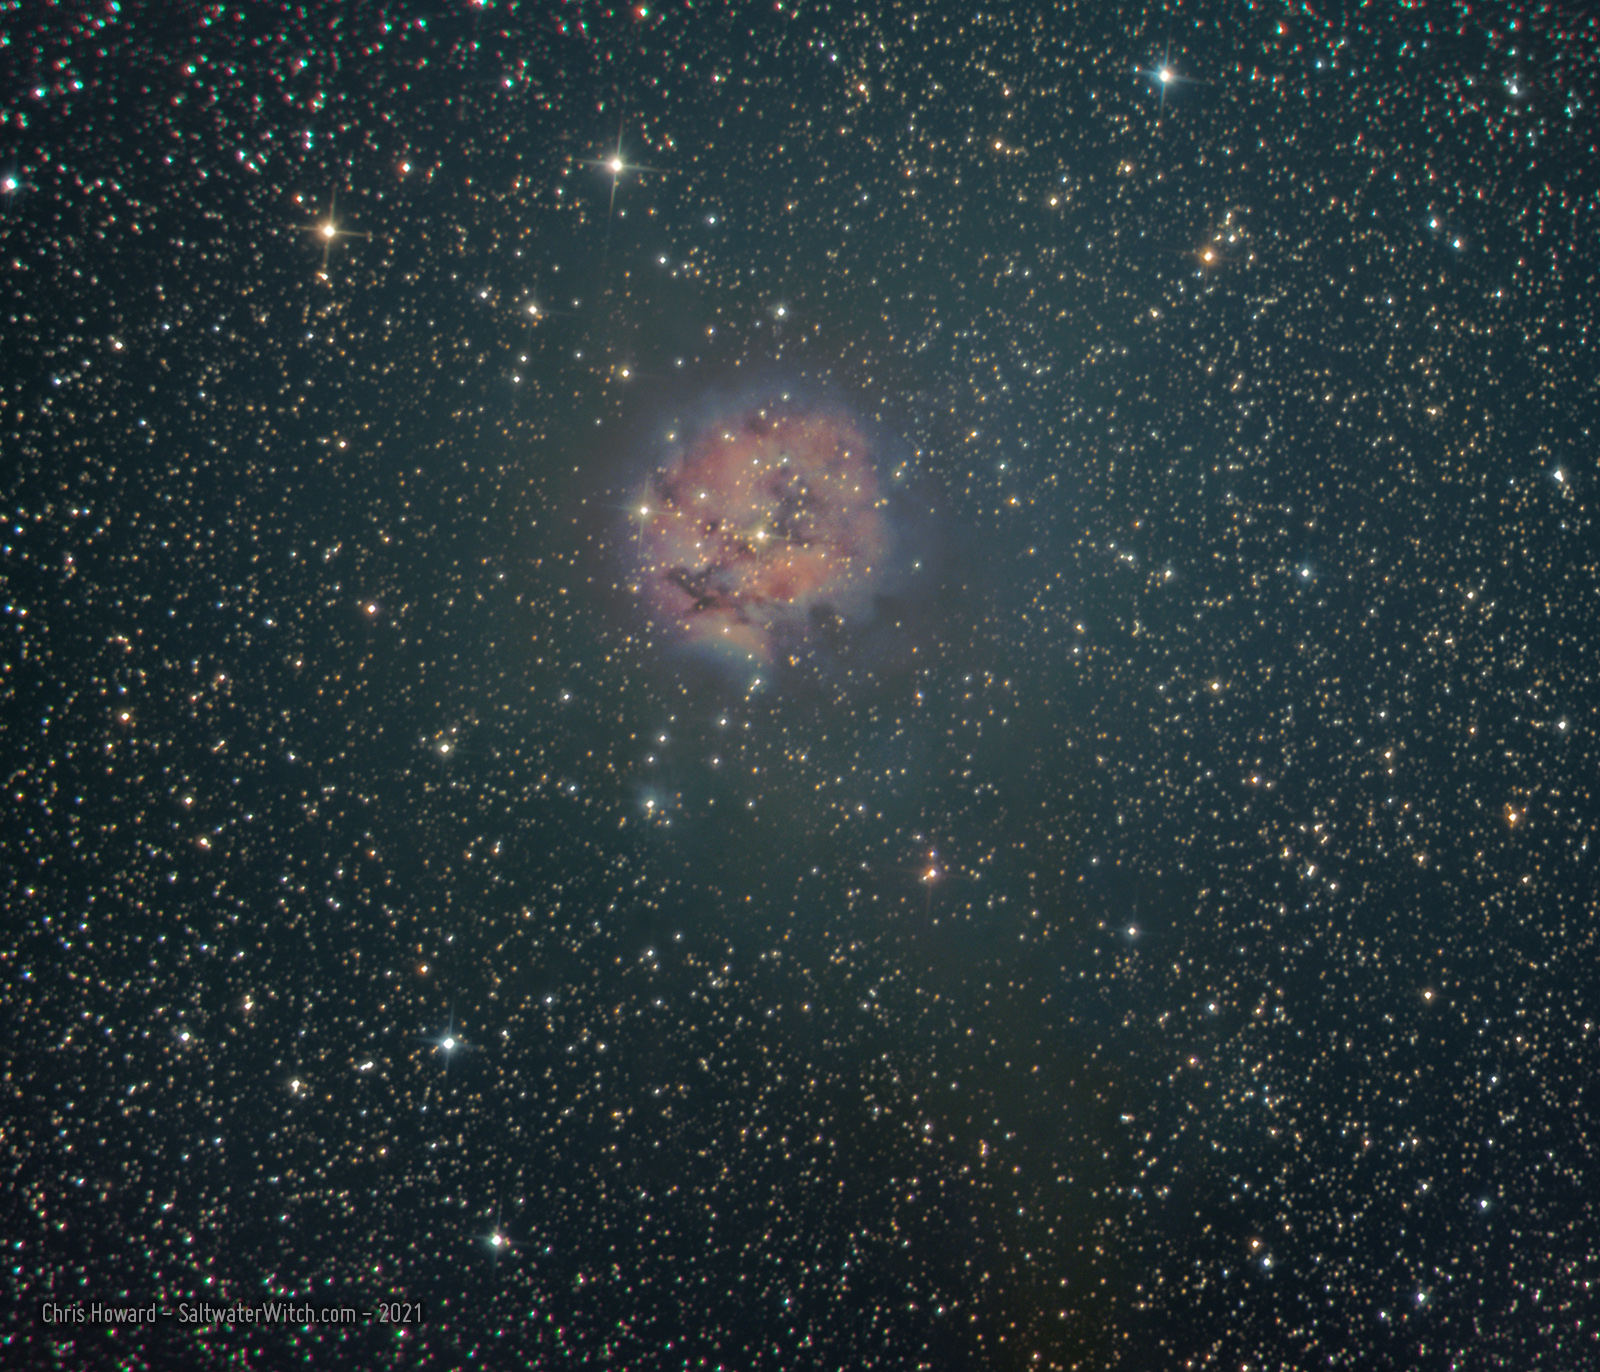
The Cocoon Nebula (IC 5146, Caldwell 19, Sh 2-125) is a roiling mix of new stars, ionized gases emitting light, mostly in wavelengths out at the hydrogen end of the spectrum, with additional layers of clouds of dust and gas lit up by those same stars. Actually, most of the ionizing weight appears to be carried by the central pre-main-sequence B type star, BD+46°3474. The whole circular structure labeled IC 5146 is a reflection nebula and an H ii region that forms a "cocoon" around BD+46°3474 (that bright star in the center), which is probably less than a 1 million years old and is probably closer to 100,000 years old (compare that to our star, the Sun, at 4.6 billion years old). This central star's intense radiation and stellar winds have hollowed out the dense molecular clouds, and the radiation flowing off it is ionizing the material and lighting it up. There's a long dark band of gas trailing off frame at the bottom of this image that leads to a separately identified dark nebula, Barnard 168 (B168). The Cocoon is around 2500 lightyears away in the constellation Cygnus. Imaging Notes: There's so much going on here across the visual spectrum right on out to hydrogen-alpha and near-infrared. Most color astro cameras, DSLRs, and mirrorless cameras will be able to pick it all up. If you can, light pollution allowing, try to catch the Cocoon Nebula without any extra filters. My imaging run: 67 x 240 second subs, no filters. Apertura 8 inch f/4 800m FL Imaging Newtonian, ZWO ASI071MC color camera, GSO Coma Corrector, SkyWatcher EQ6-R Pro mount, Stellarmate/Raspberry Pi 4 running INDI/Ekos/KStars.
IC 5146, the Cocoon Nebula in Cygnus:
Posted June 18, 2021
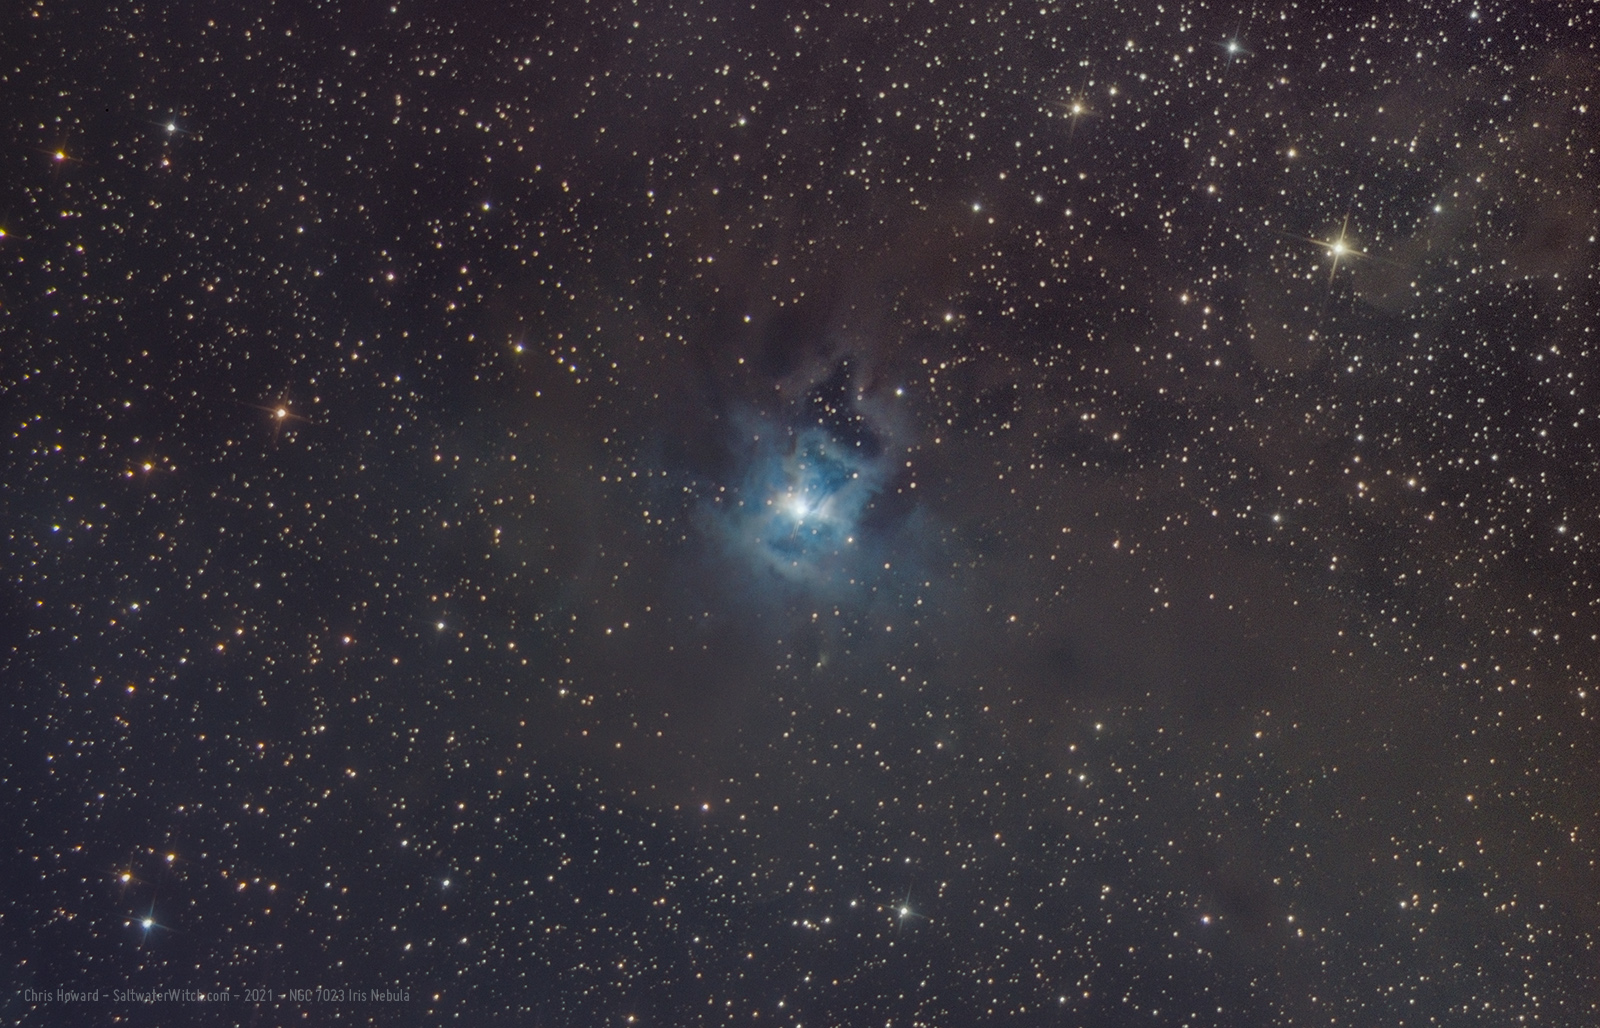
First Light with the Apertura Newtonian
NGC 7023, the Iris Nebula, is a beautiful reflection nebula in the constellation Cepheus. Unlike emission nebulas, which emit their own light and radiation, reflection nebulae are mostly dark and what we observe is starlight scattering through or illuminating clouds of interstellar dust and gas. M45, the Pleiades, is one of the most famous reflection nebulae, with a batch of violently bright blue-white stars lighting up the whole neighborhood. The Iris, in contrast, is surrounded by denser and darker clouds and does not have the intensity of the "seven sisters", the star cluster that makes up the Pleiades. The Iris Nebula is about 1,300 light-years away and that core circular region is about six light-years across. And just to give you a sense of how big the Iris is, the diameter is around 35 trillion miles, or over 56 trillion kilometers. So, pretty good size.
I think the Iris Nebula came out rather well for the first time with this new scope, the Apertura 8" f/4 Newtonian Imager. The stars are a bit wonky as I'm still playing with the coma corrector distance. But overall I had a blast with the 800mm focal length of this OTA. It's perfectly matched with the ZWO ASI071's APS-C sensor and large-ish pixels (4.78m).
Notes: 51 x 240 second subs, no filters. Apertura 8 inch f/4 800m FL Imaging Newtonian, ZWO ASI071MC color camera, GSO Coma Corrector, SkyWatcher EQ6-R Pro mount, Stellarmate/Raspberry Pi 4 running INDI/Ekos/KStars.
Some shots of the Apertura Newt in action--during the imaging run for the Iris Nebula:
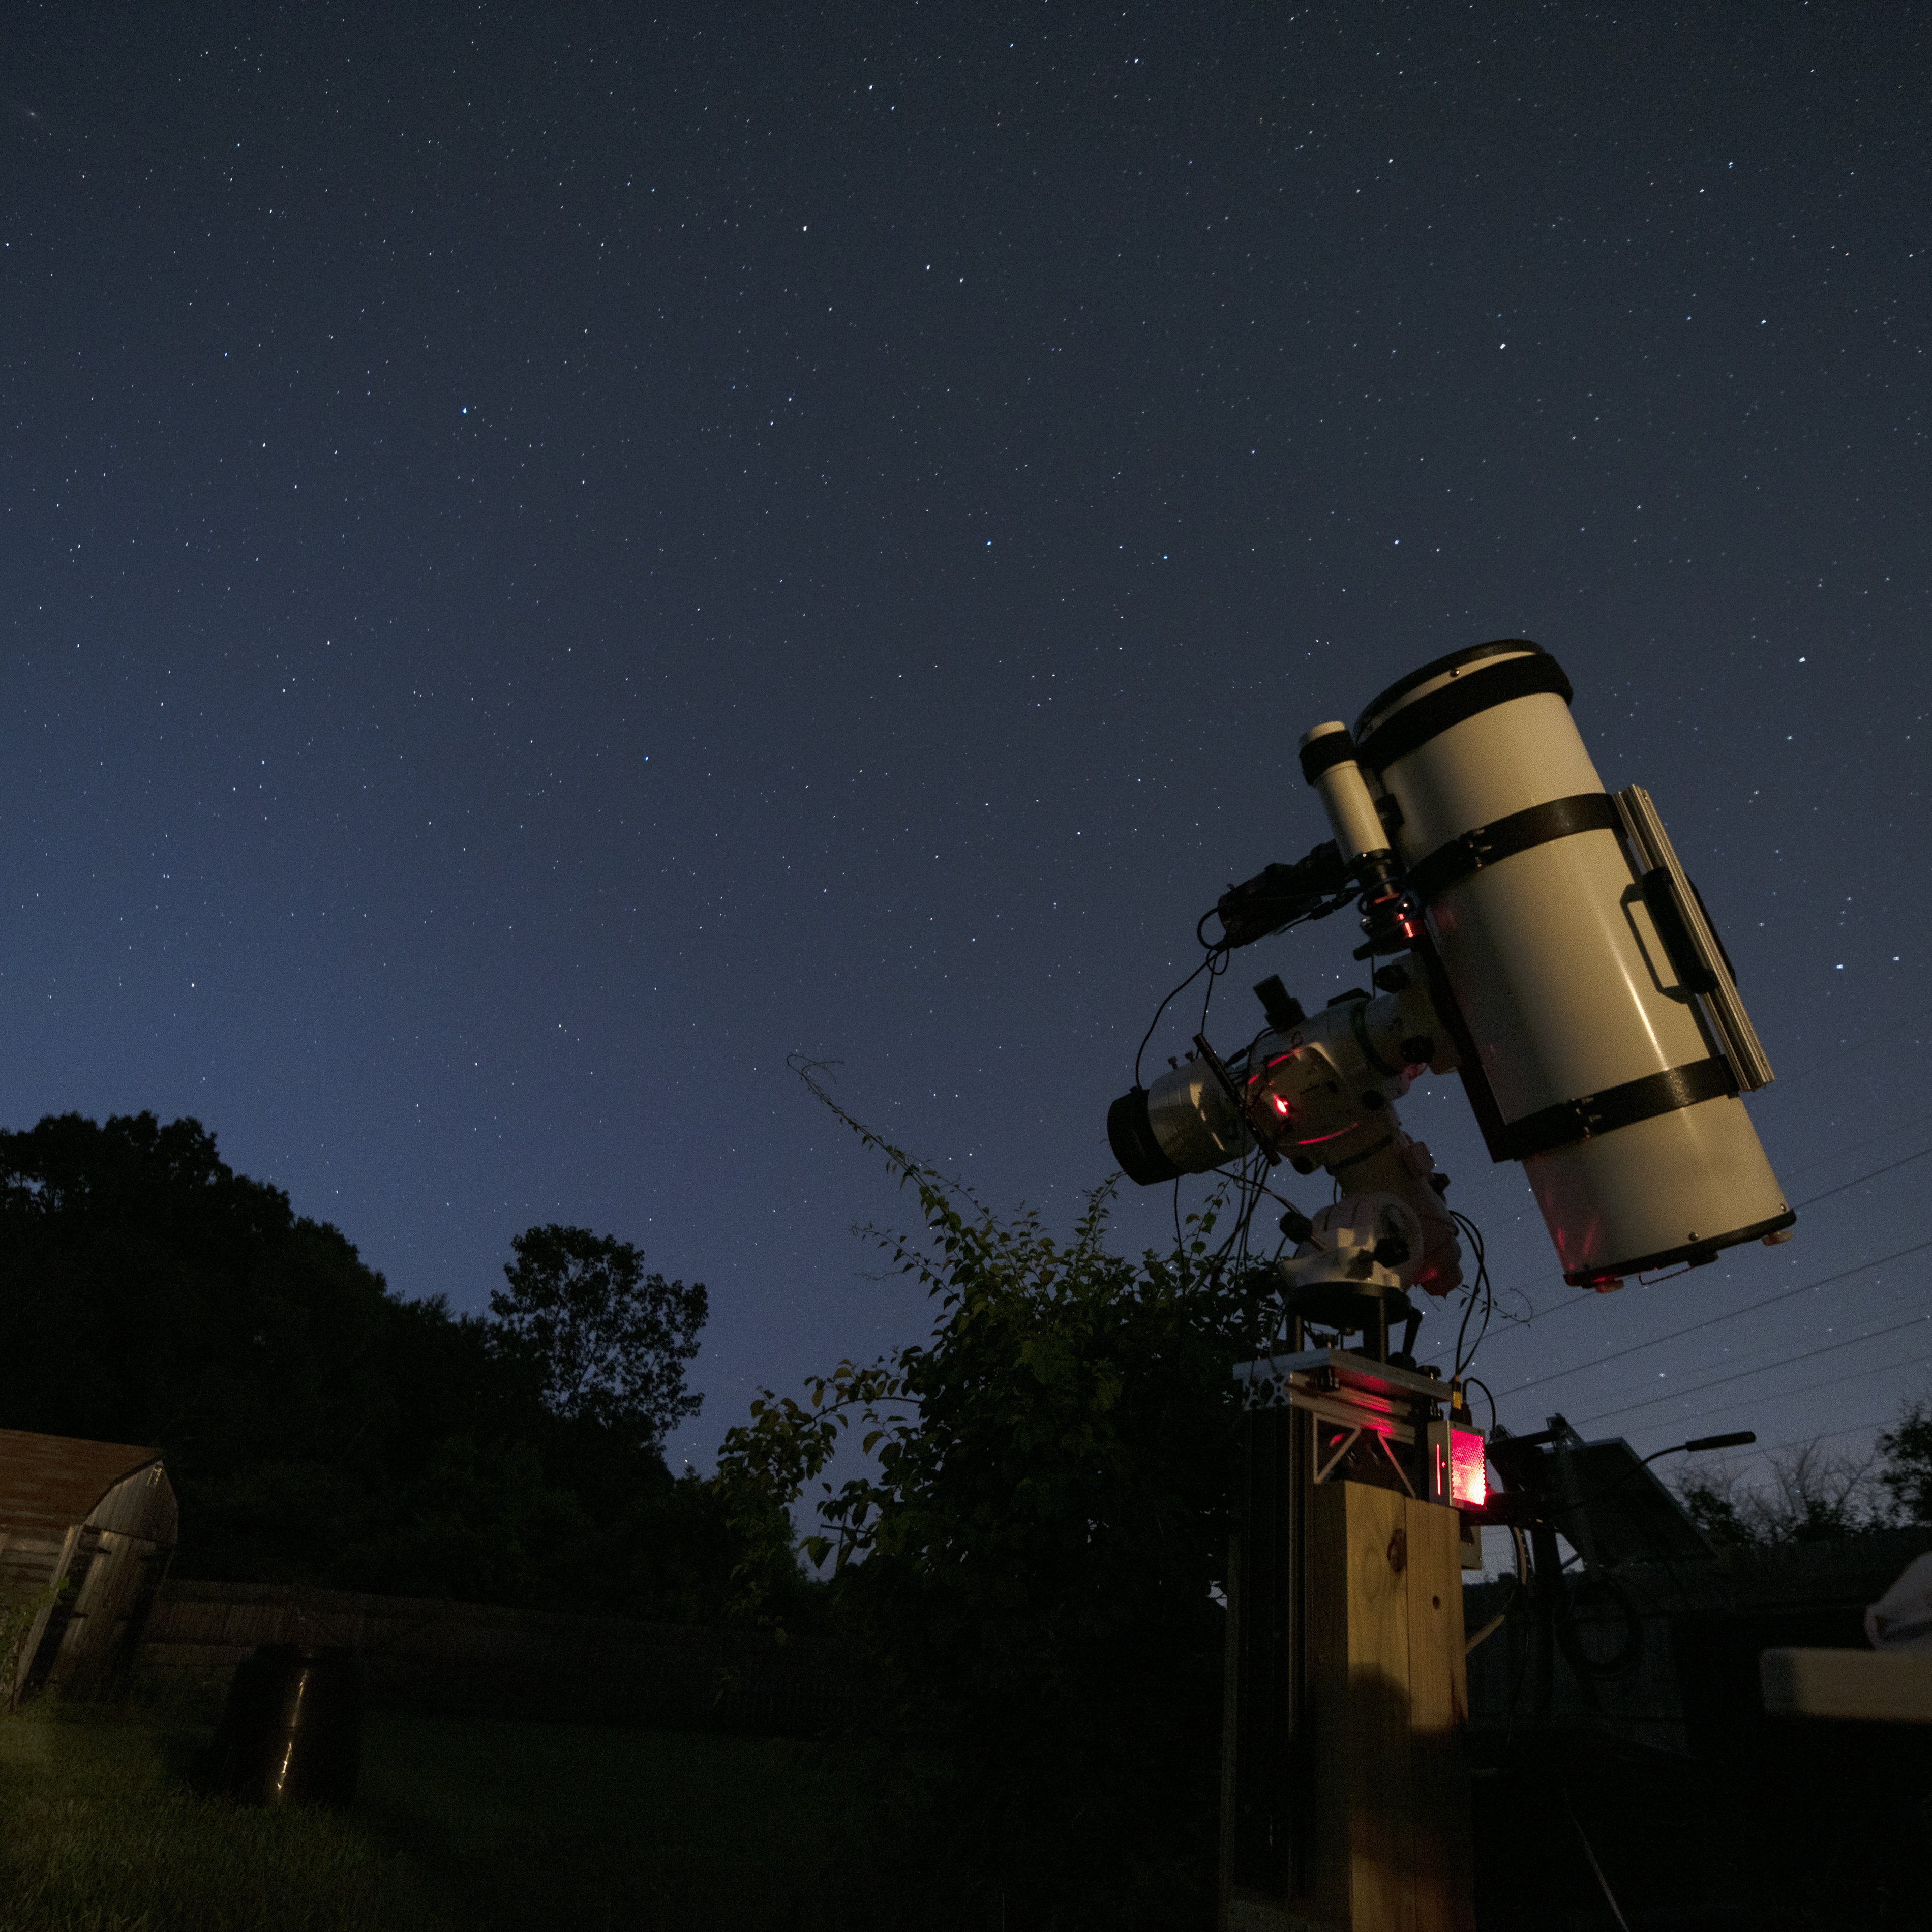
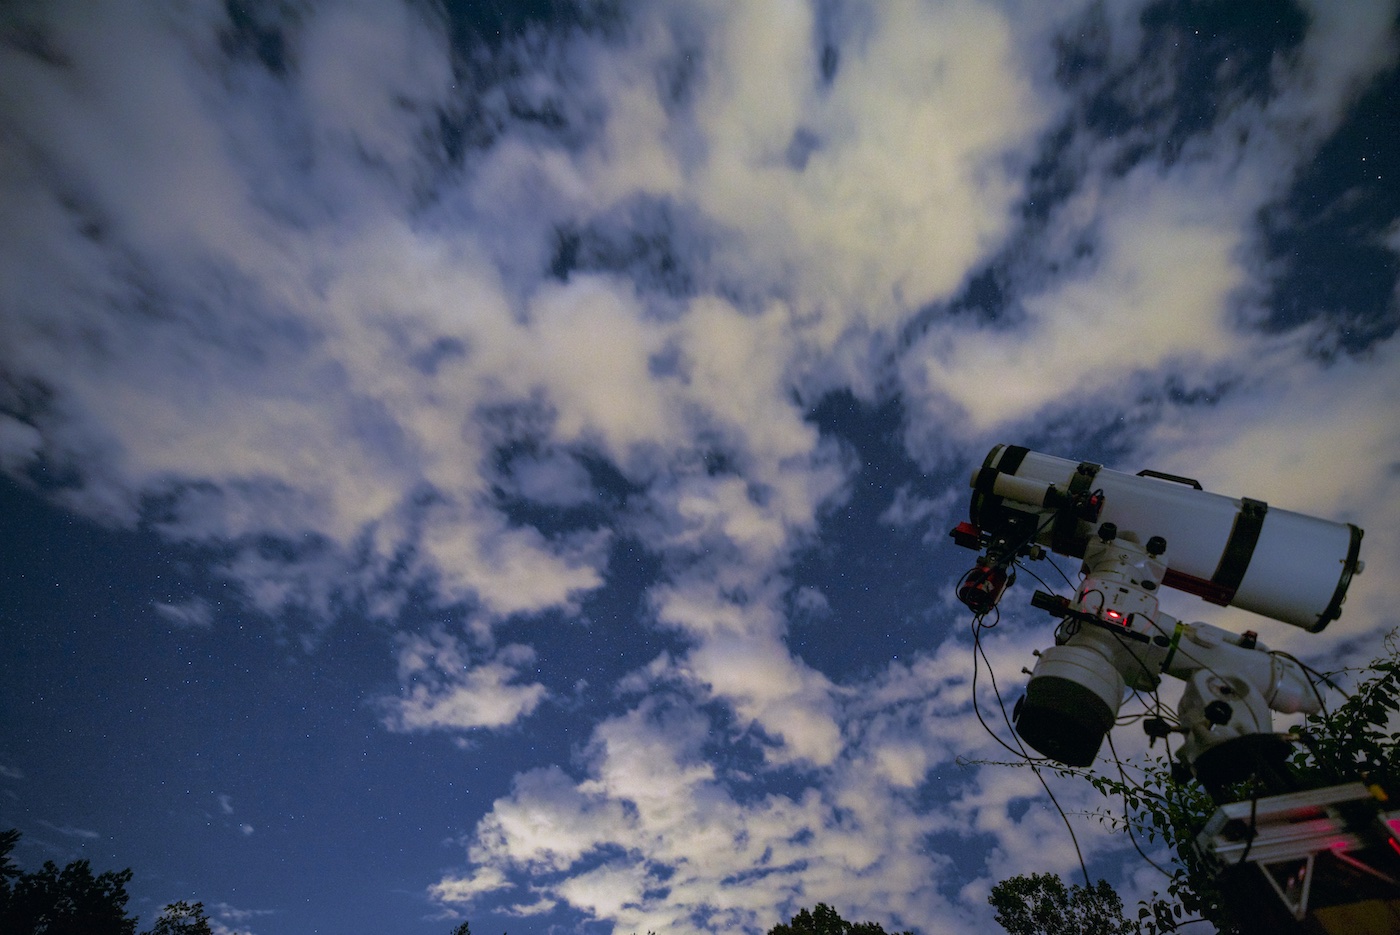
And this is what the skies looked like until after midnight: