First night out with the Sky-Watcher EQ6-R Pro
My first night out with the EQ6-R was not without troubles, but none of those had anything to do with the mount. So, first time using the new mount and it performed flawlessly—easy setup, easy polar align (using QHY Polemaster) and guiding was reasonably solid—in the .7" - .8" RMS area. I will say I've been using EQMOD for years, and understand all the little quirks in the workflow that make it difficult—and even weird—for first-time users. I spent the entire night on a two panel narrowband mosaic of IC 1396, the Elephant Trunk Nebula, but didn't get enough data for the second panel. I'll post a crop of the first one below in hydrogen-alpha, stacked 71 x 480-second subs with the ZWO ASI1600MM-Pro and 6nm Astronomik Ha filter.
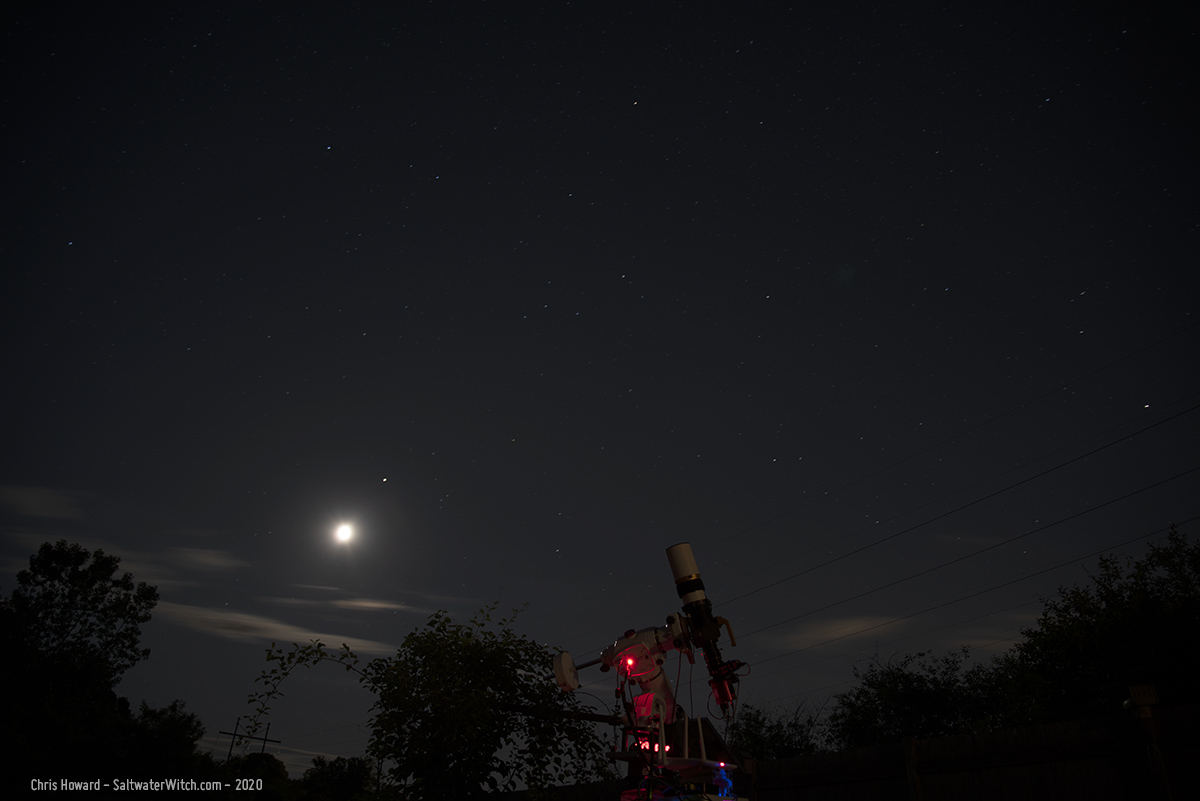
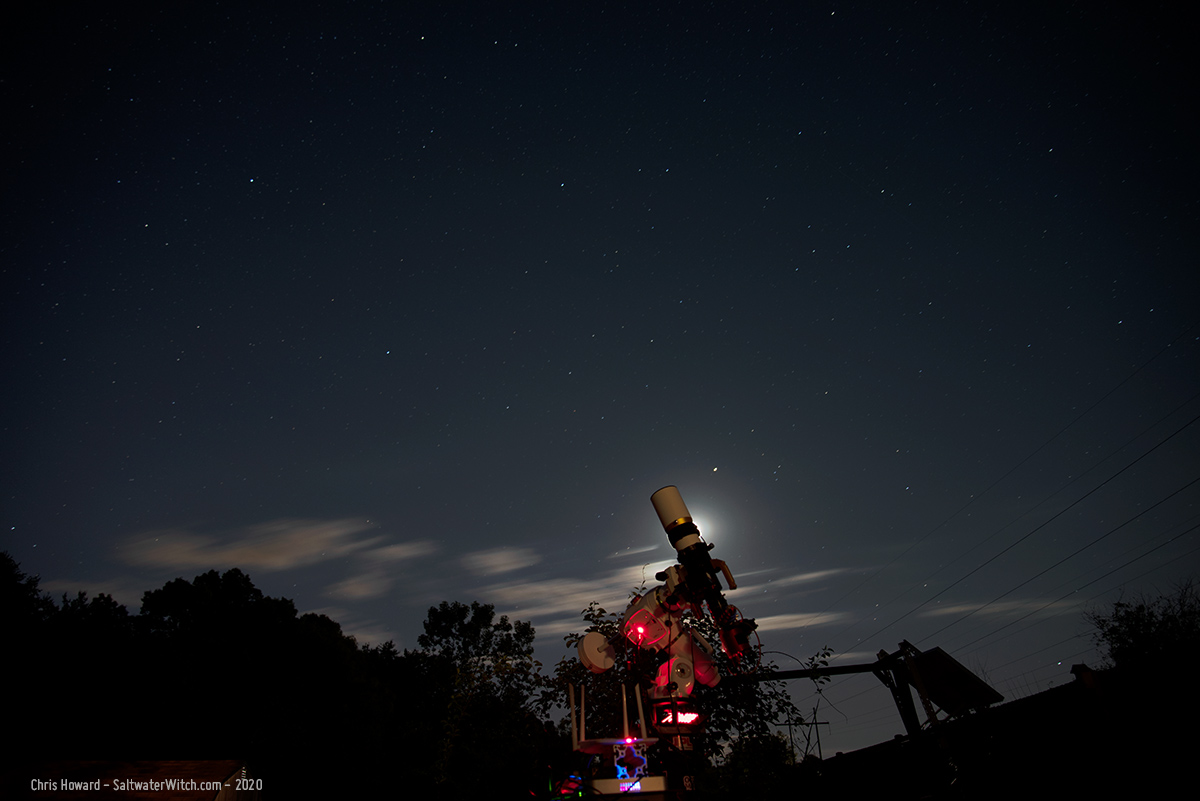
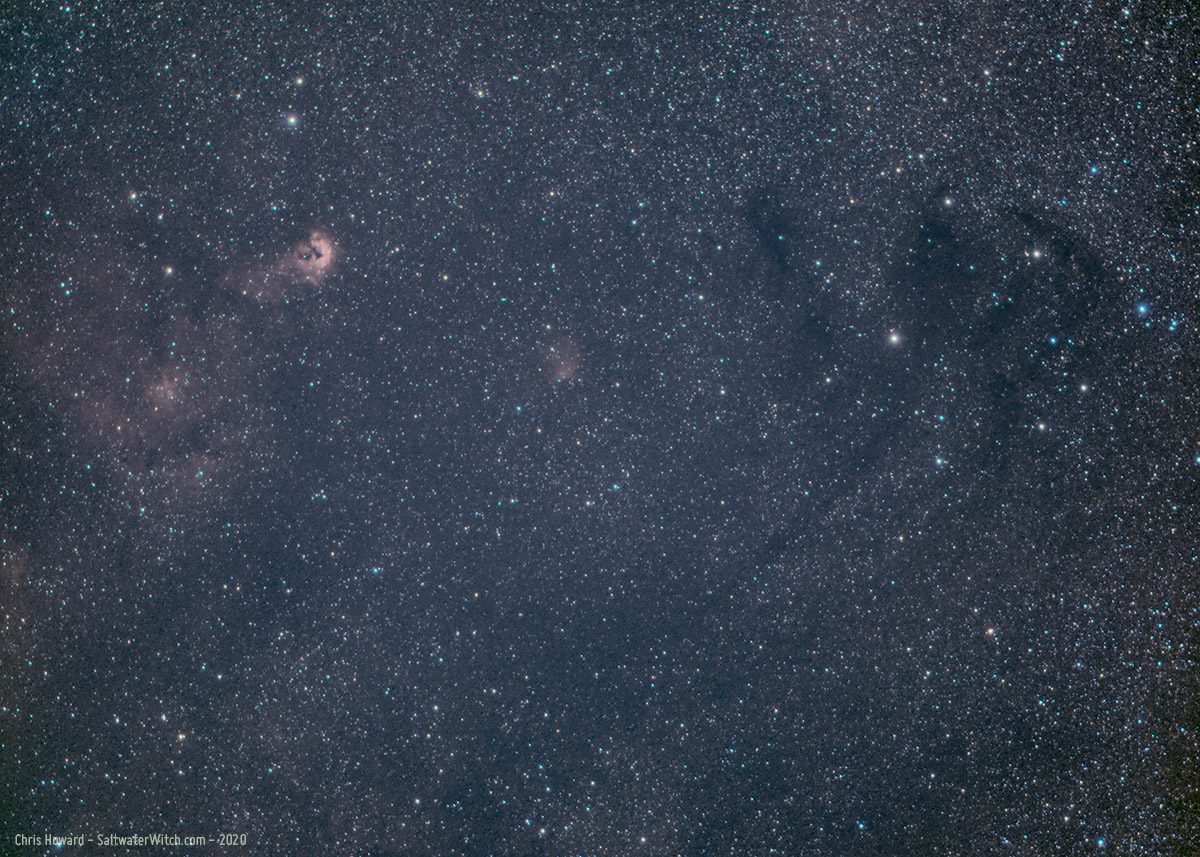
Before we get to IC 1396, I want to show off some pretty neat 30-second exposures I shot with the Nikon D750, a couple around midnight, and the last two around 3:30 in the morning, with the moon rising.
And this next shot is why I think we all need to get out under a clear and relatively dark night sky once in a while. I was just looking up in wonder, setting down the tripod with the D750 once in a while to take a 30-second exposure. I wasn't really thinking about what would be in the shot other than having my gear in the foreground--the focus isn't great in this one, but that doesn't really matter. It wasn't until this morning, looking through a set of these, that I immediately saw Cassiopeia (that W asterism toward the top left) and the double star cluster in Perseus below. And from there my eye just follows that ramp of stars in the constellation Andromeda to the right. If you walk up those three stars angling out from the end of my scope (just to the left)—one more step and you'll land on that softer smear of light. That's M31, the Andromeda Galaxy. If you look along the left side of the scope where that brighter red LED light emerges, there's a wedge of stars, like a slice of pizza, with the point closest to the scope. That's the constellation Triangulum. There's a dim dot of light up from the point star, angling toward the scope. That's M33, the Triangulum Galaxy. All of this was in the sky above me--above all of us in the Northern Hemisphere. There's so much more in this shot, but I would need to draw lines and write labels. What's actually going on in this shot--I mean, with my telescope, mount, cooled monochrome cameras and narrowband filters? I'm in the middle of taking 70-something four-minute exposures of a large HII region in the constellation Cepheus, which is above Cassiopeia--partially, with some of it off frame.
The moon was above 20° at 3am, with Mars just above it and to the right, and then way over on the right, that brighter object is Saturn catching up to Jupiter, which is out of frame, off the right side.
And finally, I had to take a shot with the William Optics GT81 blocking the moon's light:
Here's a reasonably processed stack of 71 subs of IC 1396 in the Constellation Cepheus, cropped to show some of the Elephant's Trunk Nebula (structure on the left) and the clouds and filaments of dark interstellar dust (B161 is the large dark blob with wispy strands blowing off it toward the top) that drift in front of this massive region of ionized hydrogen—all that lighter gray stuff, basically everything in this frame except where it begins to thin out in the lower right. By "massive" I mean it spans 3 degrees in the sky. To put this size in perspective, the angle covered by our full moon is about 31 arcminutes or 1/2°. IC 1396 is 3° or 6 times the diameter of a full moon. And it really stands out in narrowband!
Side Note on Stacking: astro-imaging involves multiple steps, requiring many—I typically go with 20 - 100 Light Frames, which are the exposures you take of the astronomical target—the nebula, galaxy, IC 1396 in this case. (We say "sub-exposure" or "subs" because all of these will be combined into one primary exposure). Normally the Light Frames will be individually calibrated with additional exposures taken specifically to reduce or eliminate sensor read noise, fixed pattern noise, vignetting, dust, and other unwanted stuff. These are the Calibration Frames--Dark Frames, Flat Frames, Flat Dark Frames, and Bias Frames. Check out Cuiv's video (of Cuiv, the Lazy Geek astro channel) for more on calibration frames: https://youtu.be/UmmTuIEW94M

Posted June 13, 2020
Sky-Watcher EQ6-R Pro - First Impressions
I just bought a new equatorial mount, a Sky-Watcher EQ6-R Pro, to replace the Orion Atlas EQ-G, and this is my first impression of the upgrade. I know I'm late to the party with the EQ6-R. It seemed like I was one of the few people on this planet without one.
Anyway, I'm deliberately using the word "upgrade" here because I think Sky-Watcher has made some significant improvements to this line of mounts—I'm including both the NEQ6 lines and Orion Atlas EQ-G. They didn't simply slap on a thicker coat of paint, add a fancy latitude dial under glass, and call it a new mount. There was a lot of thought that went into some of these improvements, some of them minor but great to see.
The Foundation
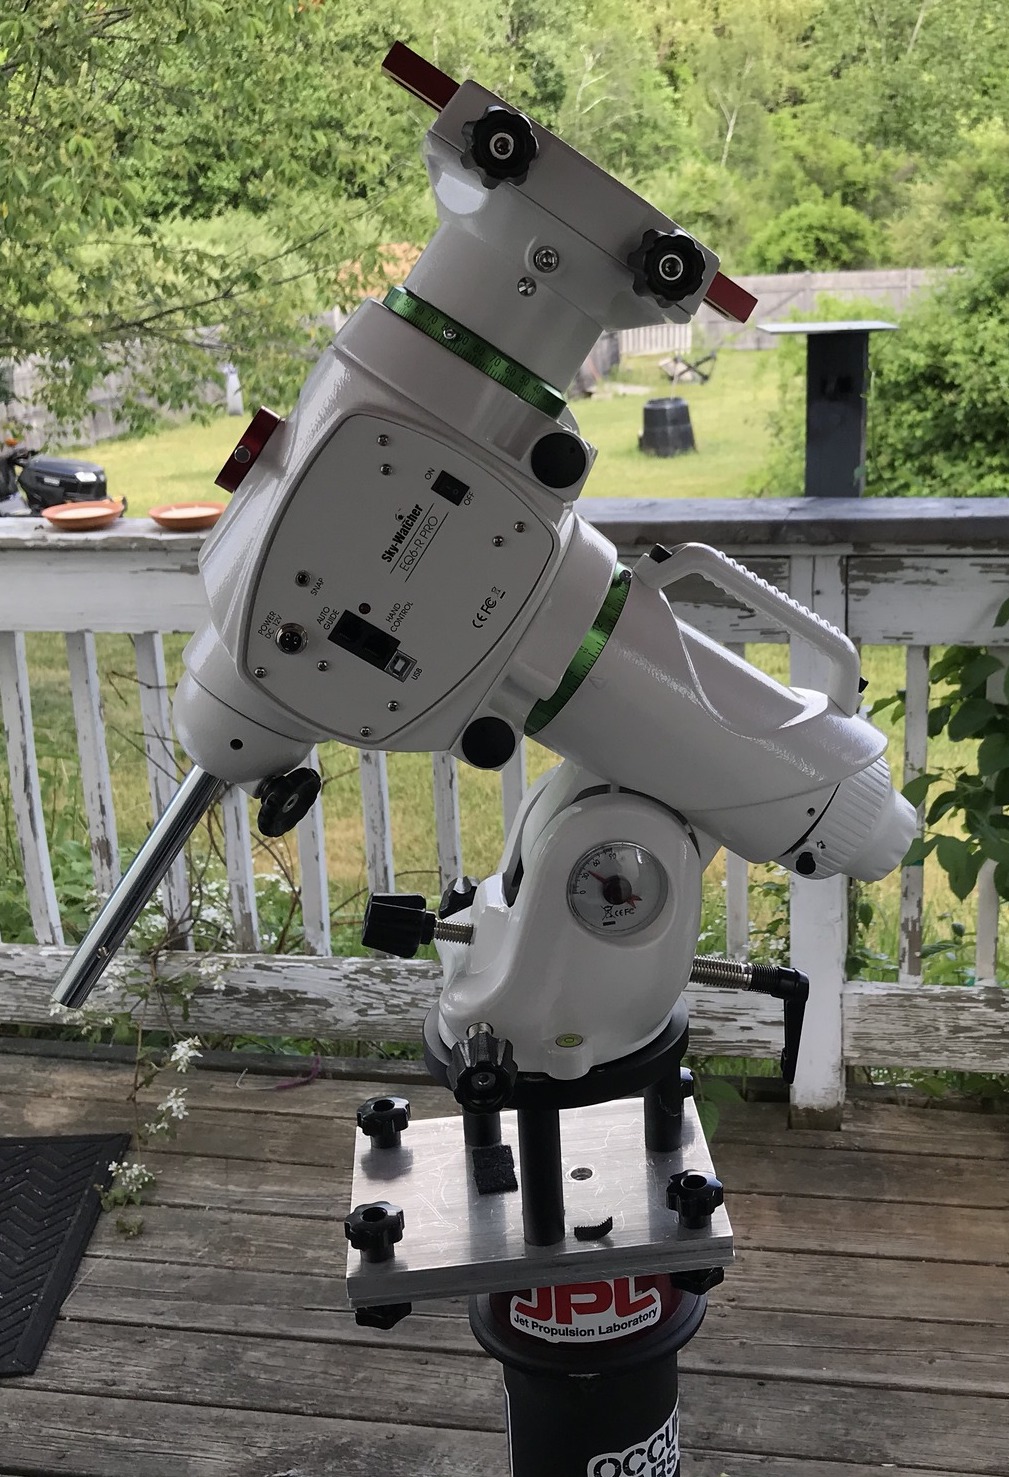
Starting with the tripod, it looks like Sky Watcher took their existing sturdy base with the 2"/50mm legs and extended the swing of the three pivot points—just a bit, giving the whole thing a broader and more stable stance. I believe this was rolled out with the NEQ6 line a while ago—maybe a couple years, but never made it to Orion. As far as I know the Orion Atlas EQ-G still has the narrower, slightly less stable design, but the Orion Atlas II will have the tripod upgrade (Orion OEMs the Sky-Watcher mounts, adding their branding and colors—black and silver instead of white and green). Stability improvements in the tripod is what I like to see. It's a minor enhancement at best, but it means someone at Sky-Watcher is thinking about the details, the small stuff that will add up to make the whole much better--noticeably better.
Belt Drive
The first time I slewed with my Orion Atlas EQ-G the high-pitched whine of gears surprised me. Until I realized that was normal. I don't really notice it anymore, but compared to the smooth and quiet operation of other mounts like my iOptrons, it's enough to frighten new astronomers. At their core, all of these mounts using worm gears for RA and DEC will have some backlash, but with belt-driven mechanics, the gears can remain engaged to some extent and backlash will be reduced. Periodic error will also be reduced. So, quieter slewing, reduced backlash, lower periodic error. Thank you, Sky Watcher.
There are a couple nice improvements to the EQ6-R Pro front panel.
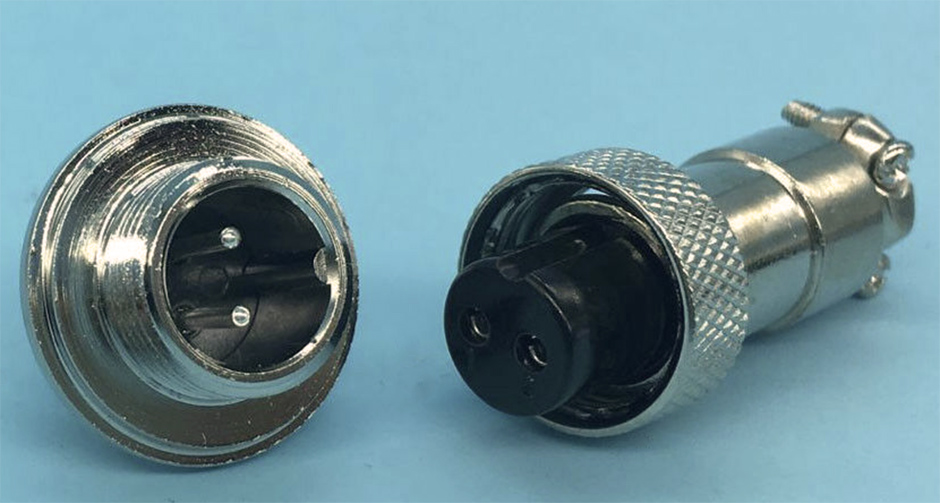 The power connector upgrade to a threaded aviation plug that allows you to easily connect and secure your 12v dc cable is an interesting improvement. I have never had a problem with the 5mm jack falling out, but I've heard that others have, so this approach definitely works, even it uses less common hardware: a GX12-2 pin aviation connector. I have seen reviews from the UK where Sky-Watcher included a 4 amp power supply with the mount, but the version I bought in the US only includes the power cord with the 2-pin connector at one end and a 12vdc "cigarette lighter" connector on the other. I immediately cut that off and soldered in a female 5mm jack—that works so much better for my power situation.
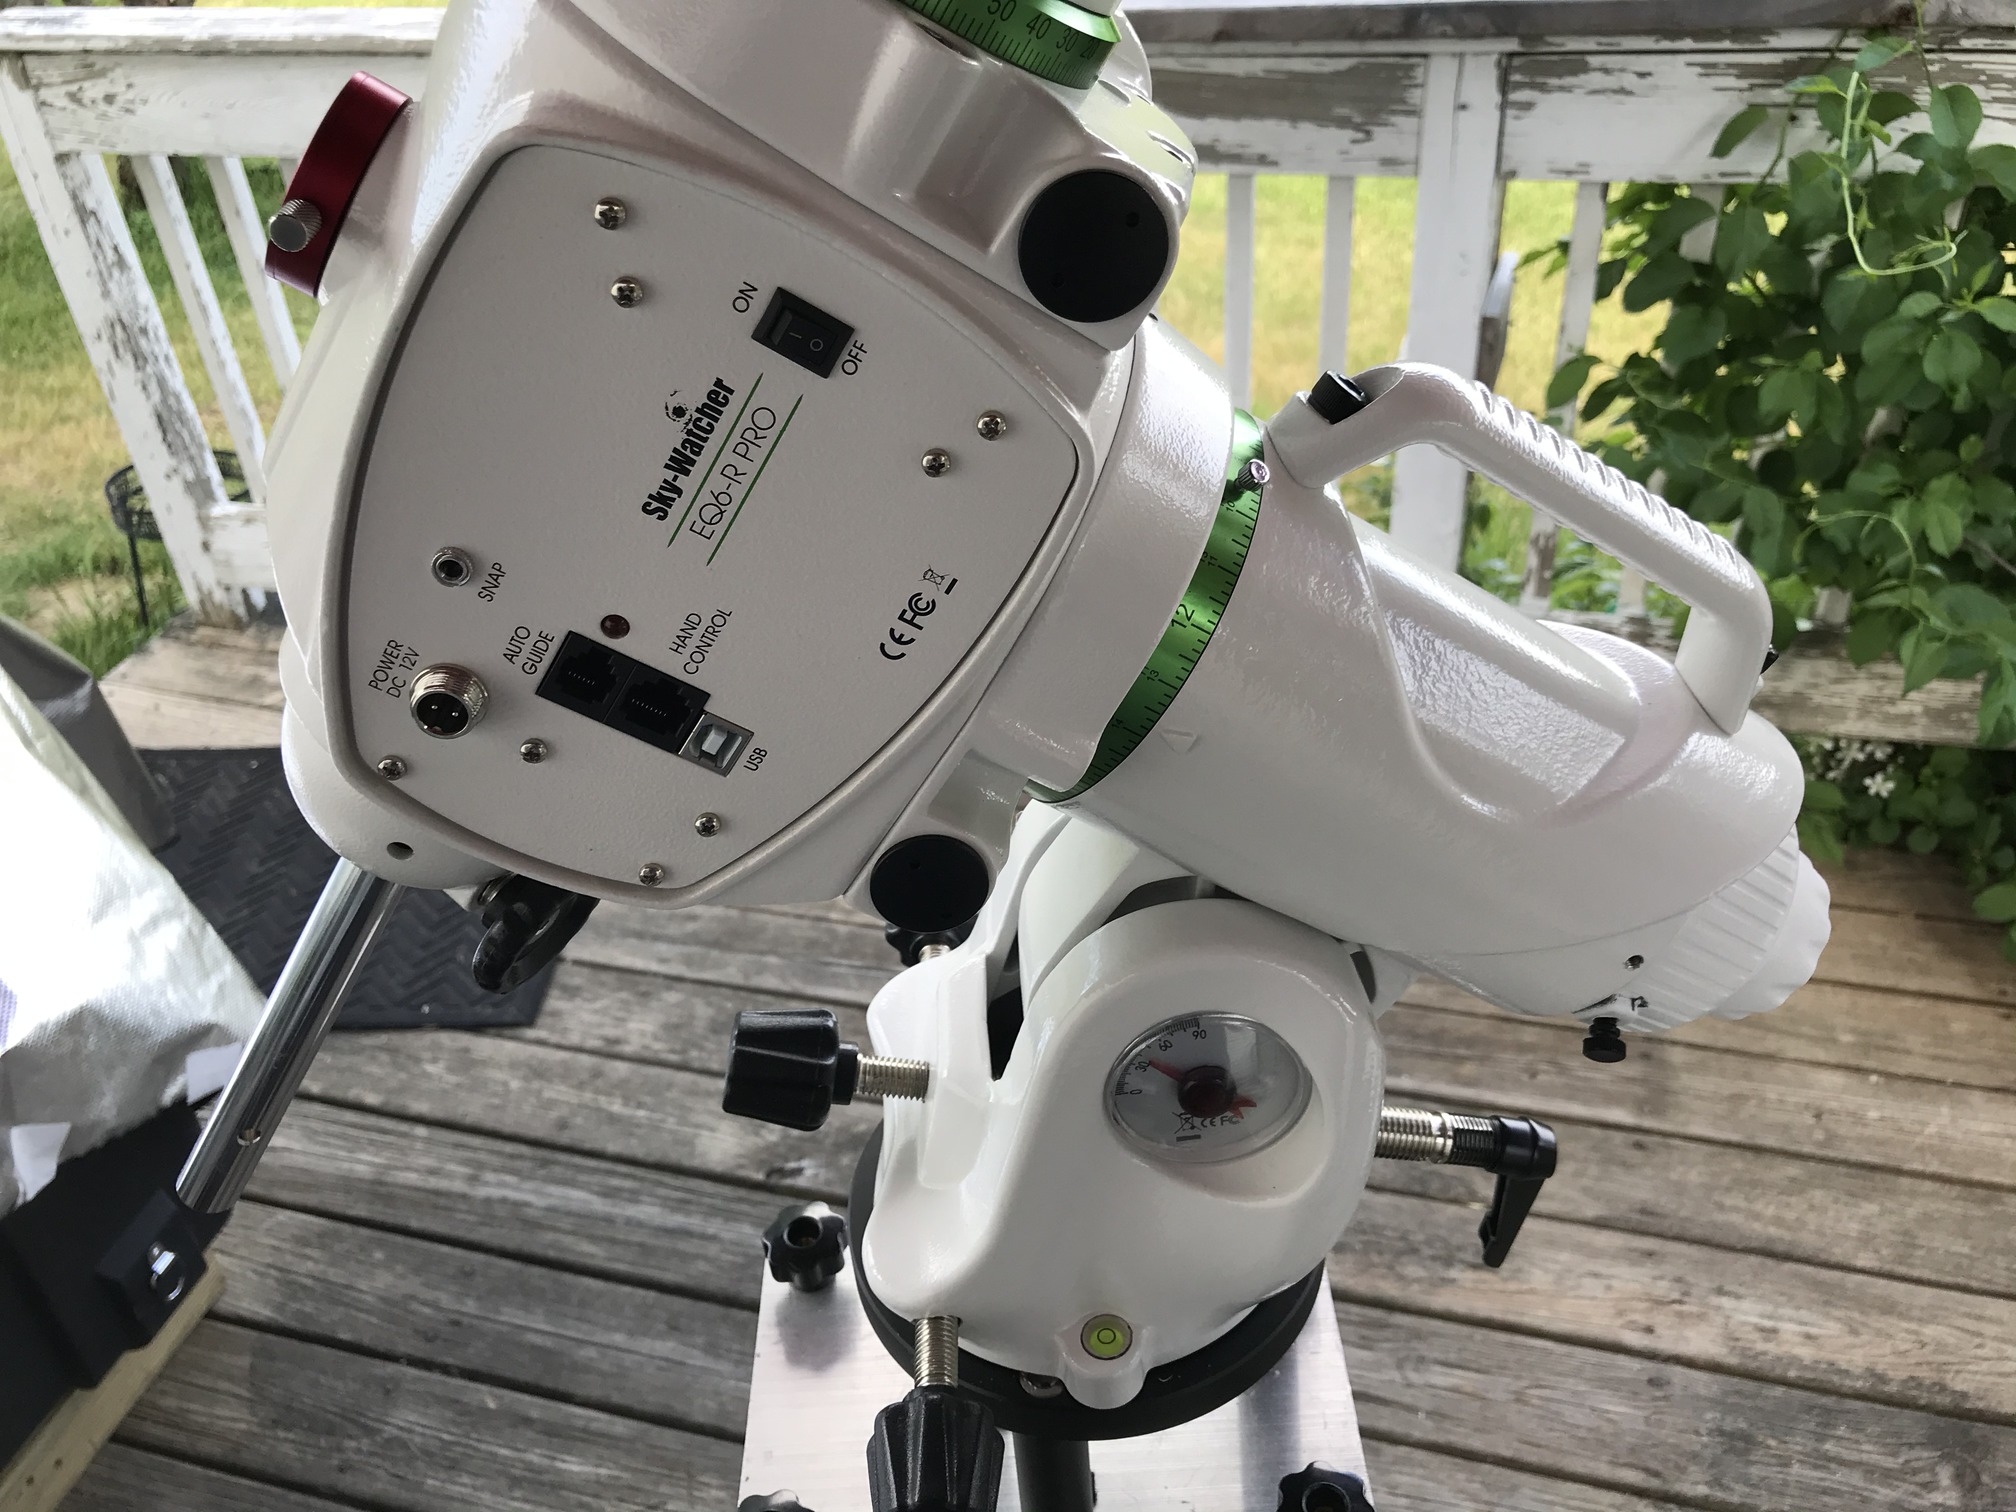 USB Port
I know there was a first generation EQ6-R that did not include the USB type B port on the front panel--see the pic. This doesn't impact mount operations or control through EQMOD or INDI, but it's definitely a nice upgrade that doesn't require proprietary cabling—any USB A to B cable will work. Again, small but significant. The DB-9 serial port on the EQ-G has always worked well, and I'm sure the serial comms through the RJ-45 jack (the one used for the hand controller in the EQ6-R) works equally well. The USB port on the front panel is another minor but useful improvement--see, these are adding up.
Altitude and Azimuth Adjustment
I'm very happy with the changes Sky-Watcher made to the mount's base, with an upgraded altitude and azimuth adjustment design, as well as improving the smooth movement between the surfaces of the mount's bottom face (footprint?) and the tripod with the azimuth adjustment dowel. It can't just be the massive azimuth adjustment knobs, there is definitely an improvement in how smooth the operation is with the EQ6-R Pro, and maybe that has to do with how weight is distributed?
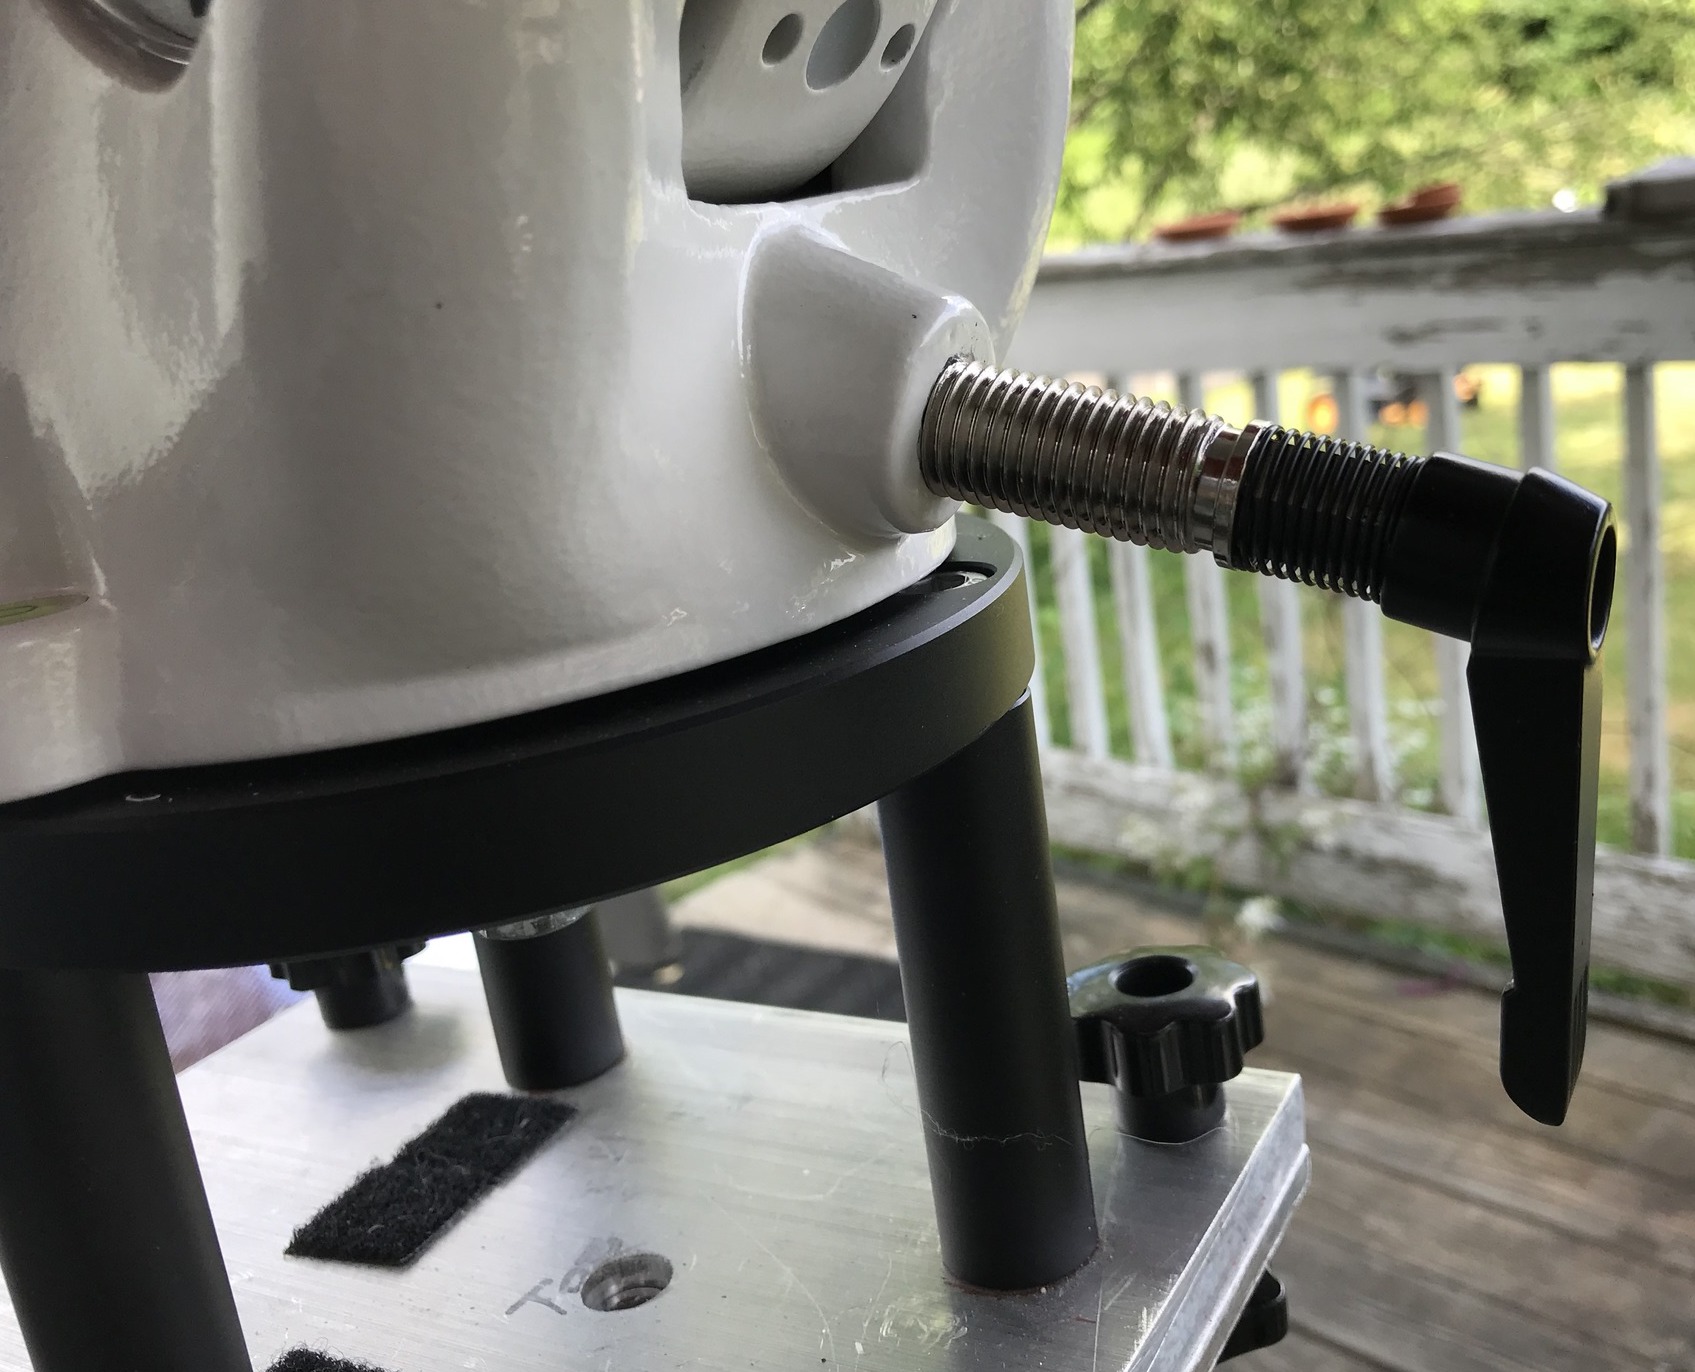 The altitude adjustment upgrade is the real winner for me with the EQ6-R Pro, even if they are essentially using the same design, with heavy-duty bolts pushing against a thick metal tab that sticks out from the bottom of the central RA axis component. I have not put this mount through a serious imaging session yet, but through several setups, alignments, and adjustments, it seems like a significant improvement over the altitude adjustment mechanism in the Orion Atlas EQ-G. Oh, and the big chunky knobs and increase in the diameter of the bolts is so nice to see.
Some flaws
Okay, the old wobbly skinny counterweight shaft must go! I can only assume that some exec at Sky-Watcher, a former engineer, designed this thing back in the day, still thinks it's the coolest thing, and they refuse to let it go. Seriously, Sky-Watcher, I have heavier duty counterweight bars on my star tracker. It is so out of place on this heavy duty mount. Out of the box, and without some mods, the bar wiggles back and forth and can seriously affect your system on a meridian flip. There's a "clunk" when the mount moves to the other side and the weights shift. It doesn't matter how much you tighten down the locking knob—that just acts as the pivot point between your weights and the rest of the counterweight bar above. I ended up removing the saddle, taking out the counterweight bar and wrapping electrical tape around the top—so there's a slightly tighter fit within the DEC column. I also removed the locking knob completely and took out the concave piece—a thrust pin? This piece of hard plastic or metal sits loosely between the end of the threads and the counterweight bar. Its purpose seems to be keeping the chrome finish free of marks? Whatever its purpose, it dramatically reduces the ability to lock the bar in place. I've managed to almost completely remove the wobble on the counterweight side by removing it.
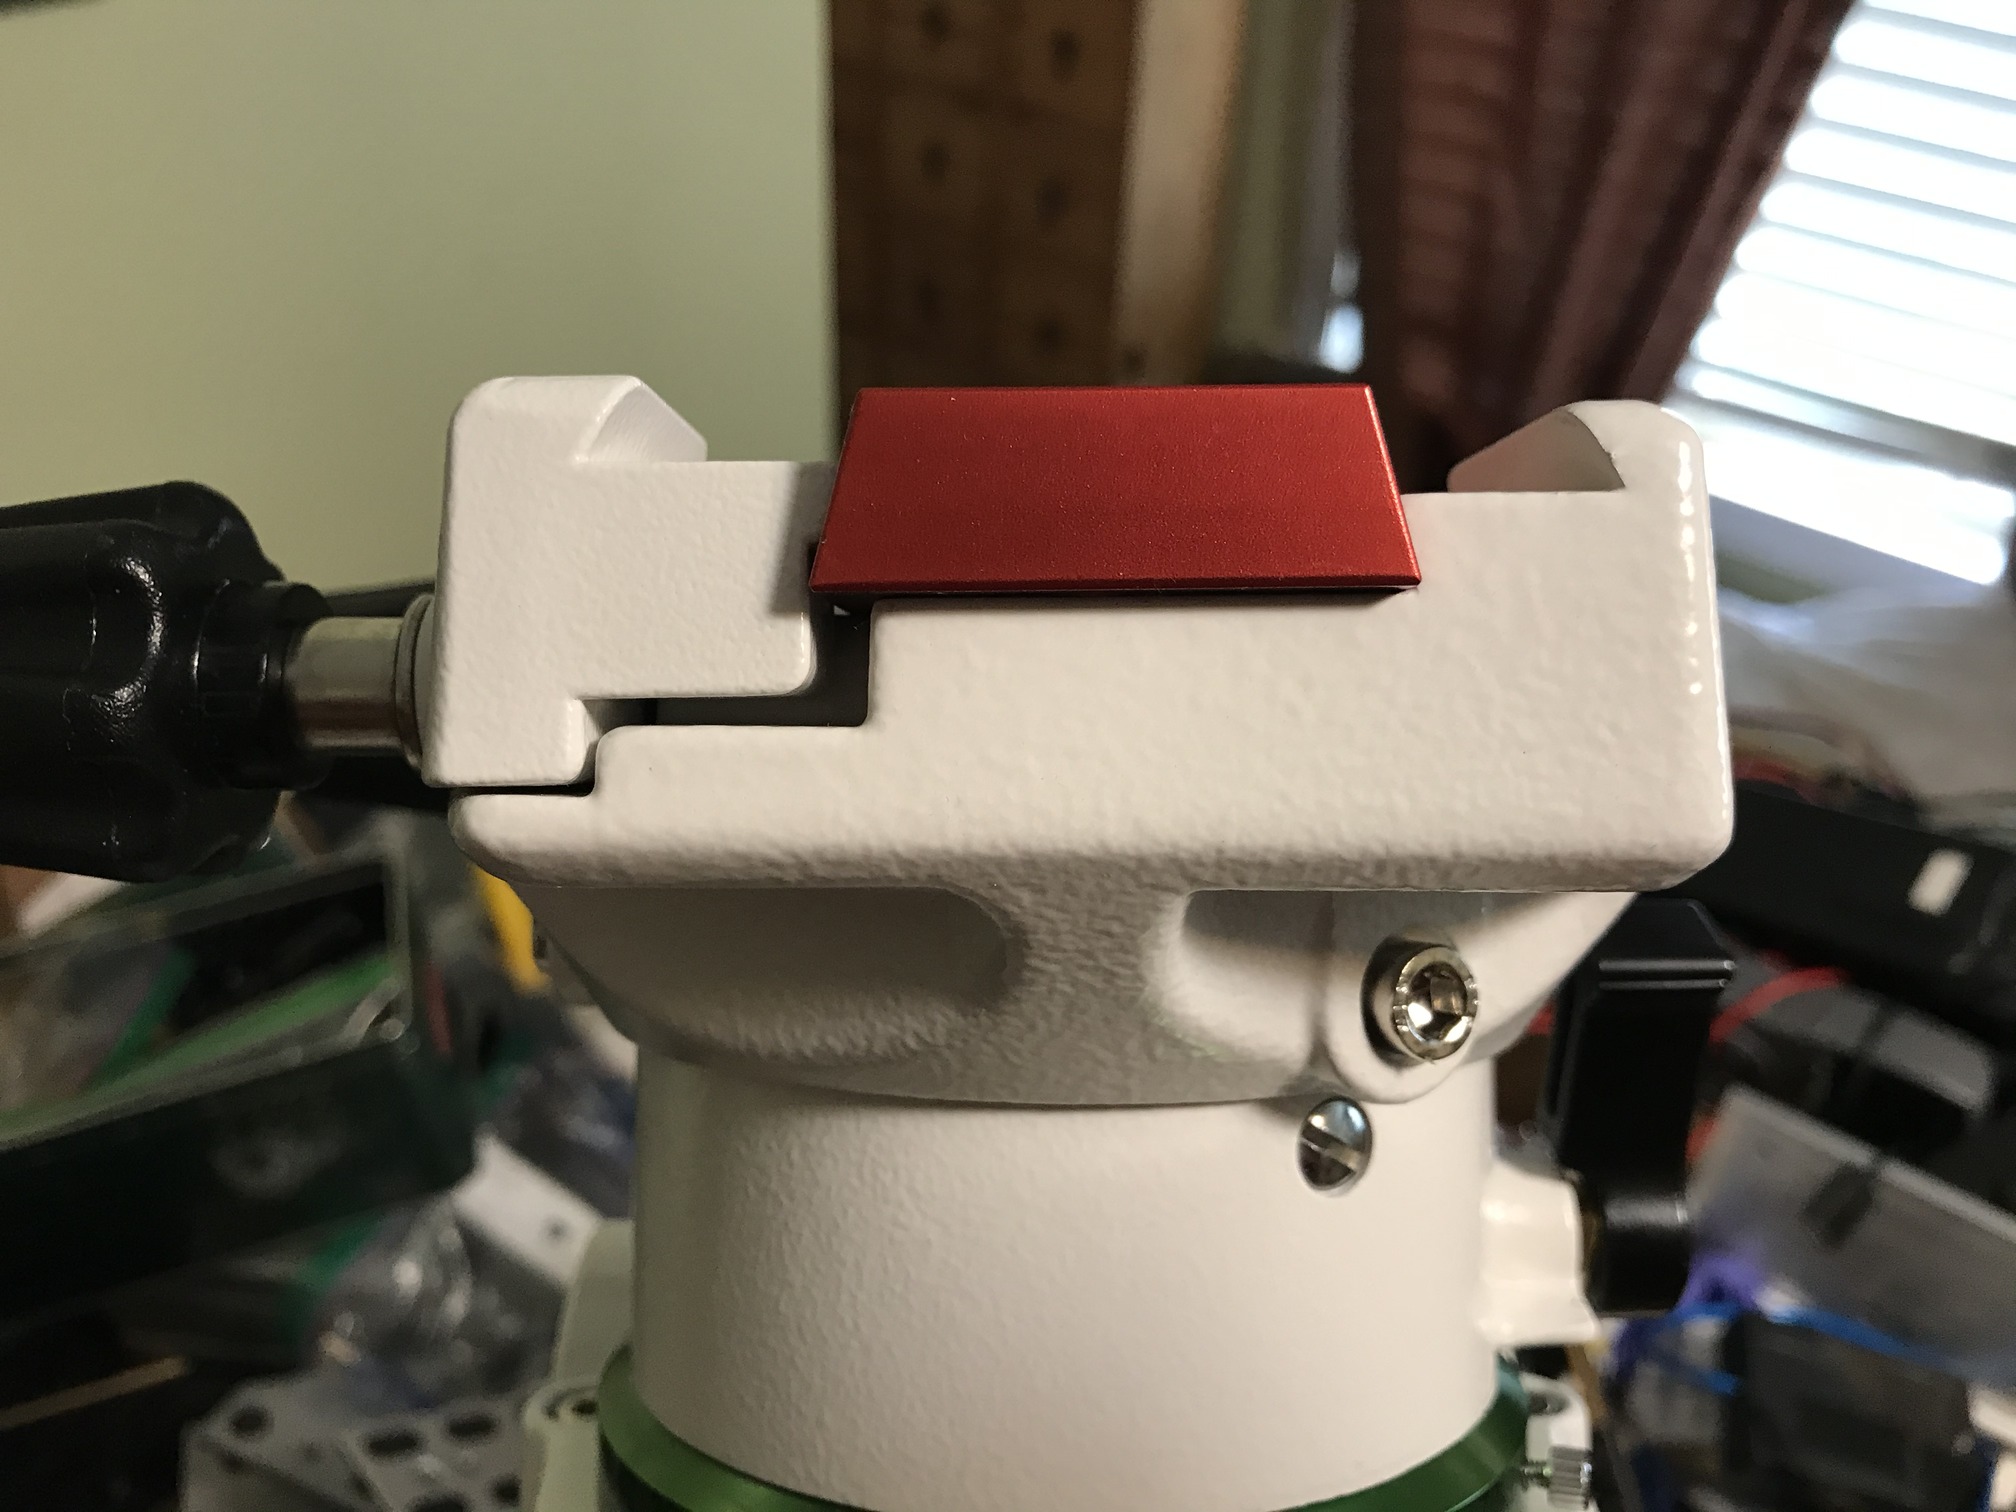 The saddle is a bit disappointing. But unlike the counterweight shaft, which is a mess right out of the box, and could use an upgrade, the EQ6-R Pro saddle is perfectly fine if your scopes and OTAs have Vixen style dovetail bars. However, I don't know if I would trust it with the wider Losmandy dovetail plates. (Or I might go with a beautiful ADM machined aluminum replacement). The problem is one side of the stock Sky-Watcher saddle is noticeably taller--offset vertically--from the other side of the saddle, and the wider plates will sit in the saddle at an angle. I'm not sure what happened here with the design or manufacturing, but someone wasn't paying attention. Again, not a problem for Vixen dovetail bars. And I also want to add that maybe this doesn't affect all the EQ6's? I noticed that Chuck has his RASA 8 on an EQ6-R Pro with the wide dovetail bar, and it looks fine.
Other interesting things
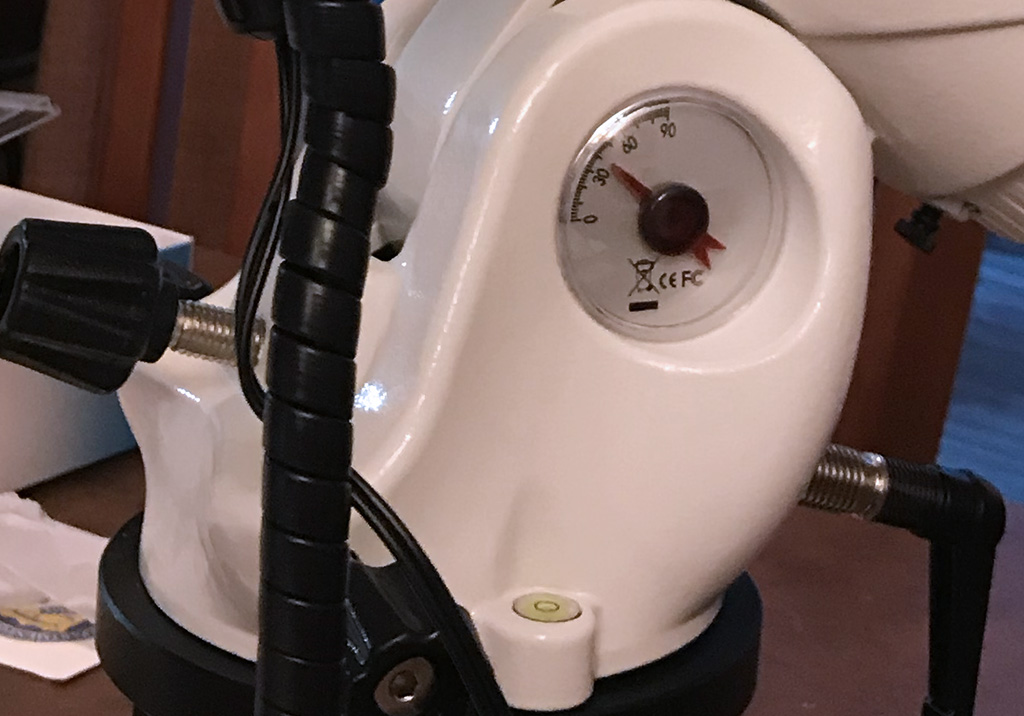 There are some new features that are not really important to me, but may be to others. One is the latitude dial, which seems a bit decorative and maybe too fragile for the mount. It's an interesting addition, but not really useful for my setup. I image almost exclusively from my backyard, so I probably won't look at this again. I use a lighter mount like the CEM25P or the SkyGuider Pro when I want to shoot from other locations. The second is the Snap shutter-release port for DSLRs and Mirrorless cameras. I rarely use either for astro-imaging, so I'm not sure how significant this is. But it is a new feature and it seems important, so, well done Sky-Watcher.
Oh yeah, one more thing...
That handle! Holy crap, why haven't we had a handle all along? With the mount head alone coming in at 54 lbs/25kg, setting up the EQ-G was always a chore. It was like carrying heavy ordinance around your house and into the backyard, hoisting it onto the tripod—I mean, what the hell? We're just doing some astro-imaging here, not arming a B-1 for a serious bombing run. But that's what EQ-G setup has always felt like. Yes, if I have to call out a feature I'm happiest with—other than the new and improved altitude/azimuth adjustment--it's that handle.
At the end of night (see what I did there?) what matters is how well this mount functions for our purposes, how well it will fit into our existing astro-imaging workflows, how easily it will be to pick up and use reliably for new astro-geeks. I am assuming most of you are into astrophotography, and the EQ6-R Pro is a great choice if you're looking for a fairly inexpensive, moderately portable mount that can handle a wide range of sizes and weights for refractors, SCTs, Newtonians, and RASAs. If you're coming from an Orion Atlas or NEQ6, you will be very comfortable with this upgrade, and very happy with the improvements. I also think this is a great mount if you're new to astrophotography. The EQ6-R Pro is the perfect balance of weight, stability, and accuracy with versatility. I just can't think of an example, except maybe the ability to hike miles carrying your astro gear, where this mount isn't going to help you out or improve your imaging. The community of EQ6-R, NEQ6, and EQ-G users is massive. Sky-Watcher builds thousands upon thousands of these mounts, and there are so many users out there—around the world—who have the answers to any possible question or concern you might have. The ASCOM and INDI support for this line of mounts is very solid, and arguably the most thoroughly used and tested of any of the mount control systems. Even if EQMOD is a little clunky and outdated looking, you will find it easy enough to use, and the support you will receive from other users—because there are so many—is invaluable.
So, there you have it, you've done a phenomenal job with this round Sky-Watcher. Just lose that crappy counterweight bar in the next and I'll be back for another upgrade!
NOTE: As of this writing, the EQ6-R Pro is on sale at OPT, where I bought mine. Go get one!
Posted June 5, 2020
Back with the GT81 and color targets shot in HaGB
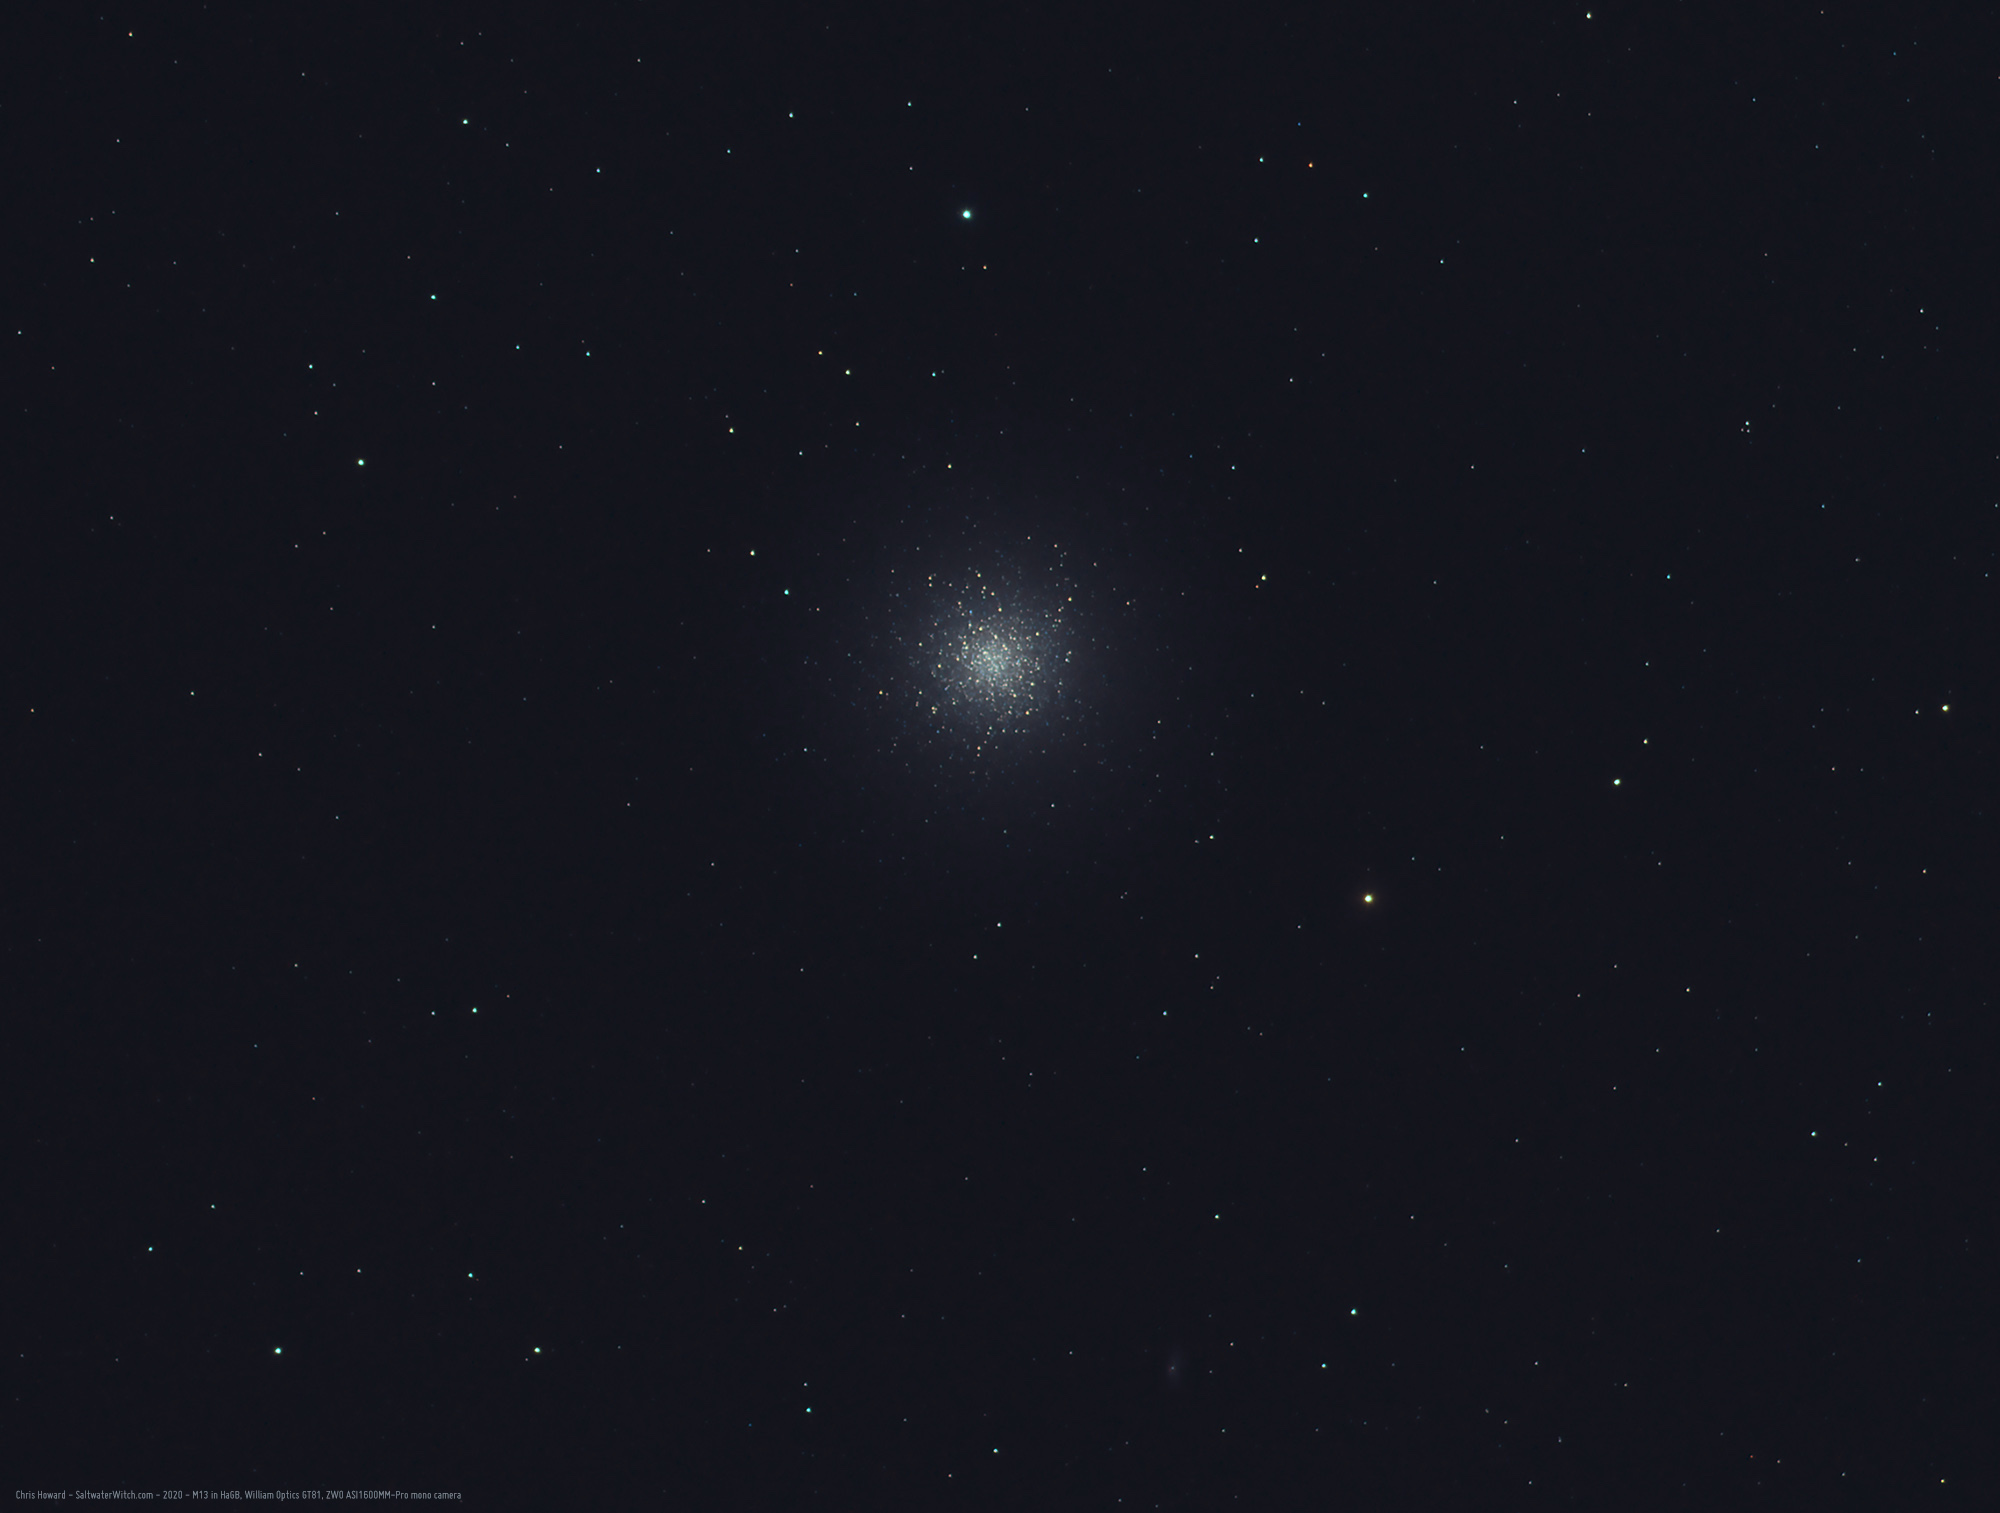
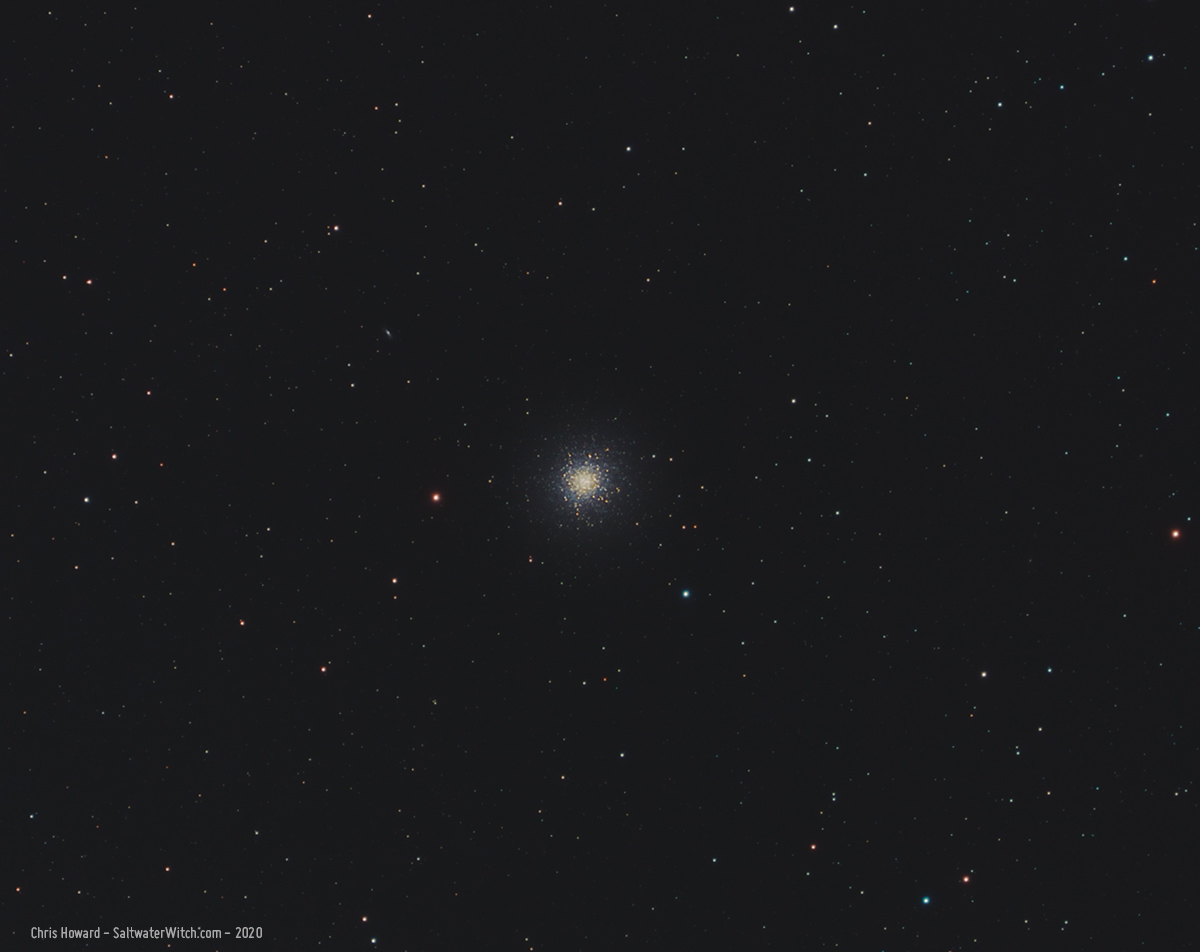
Messier 13 (NGC 6205) Globular Cluster in the constellation Hercules. I shot this in hydrogen-alpha (Ha) + Green and Blue, mapped to RGB color, with 40 x 30-second exposures for each. Notes: William Optics GT81 apo refractor + Flat 6AII, ZWO ASI1600MM-Pro mono camera with Astronomik 6nm Ha, Baader broadband GB filters, Moonlite focuser, iOptron CEM25P mount.
This one's a little more subtle. The bright, irregular HII region on the left is Sh 2-90 in the constellation Vulpecula, along with concentric swirls and knots of interstellar dust that make up the dark nebulae LDN 800, 806, 807, 808 (right side). 70 x 180-second subs Ha, 42 x 180-sec subs Blue, 39 x 180-second subs Green. I lost a batch of my broadband frames to some fast moving clouds, but managed to process what was left into a reasonably decent shot.
Setup for the night: iOptron CEM25P mount, William Optics GT81 Apo refractor with FLAT 6AII (382mm fl, f/4.7), Moonlite focuser, Orion Thin Off-Axis Guider with QHY 5iii178 guide cam, ZWO EFW with Astronomik 6nm narrowband filters (Ha, OIII, SII), Baader broadband Green and Blue filters), ZWO ASI1600MM-Pro cooled monochrome camera, Pegasus Astro Pocket Powerbox for dew control, temperature, humidity reporting. Controller: Fanless i5 Windows 10, ASCOM, Sequence Generator Pro.
Posted June 1, 2020
Saltwater Witch Micro-Observatory Project
Here’s my situation--and I think this a common one: there is a limited amount of clear night sky--and that’s with or without the moon. I have a limited amount of time to set up all the gear necessary for a night’s imaging run. I don’t have an observatory in my backyard with everything ready to go, mount polar aligned, cameras cooling down, roof or dome rolling back.
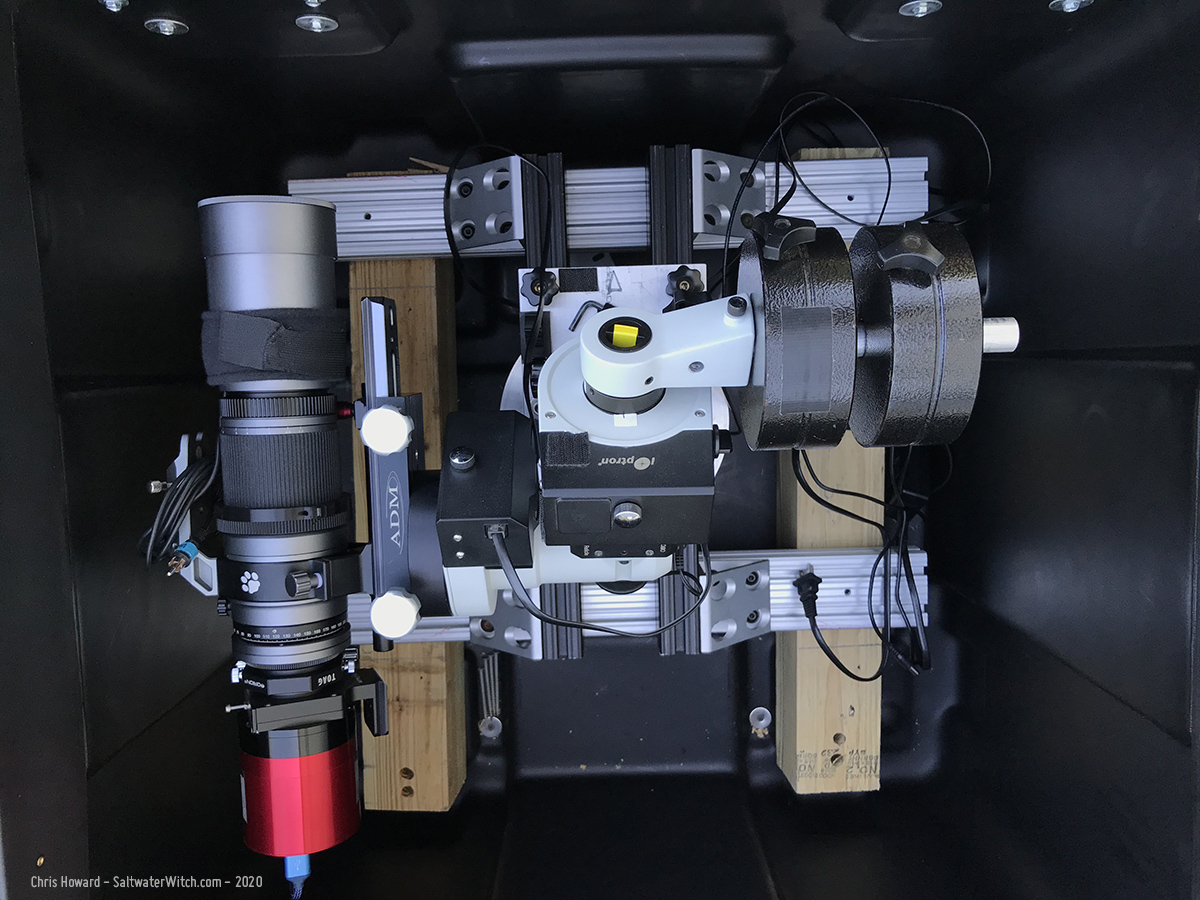
But what if I had something like a self-contained, weather-proof box with just enough room to fit an equatorial mount and a scope? Even if it’s not my main mount and scope, wouldn’t it be nice to have an astro setup ready to go at any time--ready for the next break in the clouds?
That’s where I started with this micro observatory project. My goal is to be able to set up a self-powered astrophotography system that can remain in place through any weather while protecting the equipment, and be operational and ready to image within a few minutes. I don’t need it to be fully automated for now. This is a fairly complicated setup, and so I’m going to take this in steps. The main missing piece of automation is raising and lowering the lid. Of course, all the astro gear is automated, except for a motorized cap, which won’t be necessary without the ability to remotely open and close the lid.
This is what I’m shooting for:
- Weather looks clear enough to imaging.
- Select a target or two for the night.
- Walk out to the micro observatory and unlatch the lid, set it aside, take off the telescope cap, power up everything, move mount from parked position (horizontal) to a home position, weights down and pointed at the NCP. Walk back the house.
- Remote into the astro controller (i5 Windows 10 machine) and load an existing sequence or create a new one for the selected targets.
- Ready to run!
I started testing this idea a couple years ago with wood frames, and even did some research on wood shipping crates. I settled on this giant water-tight SKB plastic molded shipping container with 27”/68.5cm interior dimensions--it’s a cube. It's made from really sturdy impact resistant and UV stabilized polyethylene (LLDPE), with stainless steel latching hardware. The stock hinges and straps didn’t work for my purpose--I’ve drilled off the hinges.
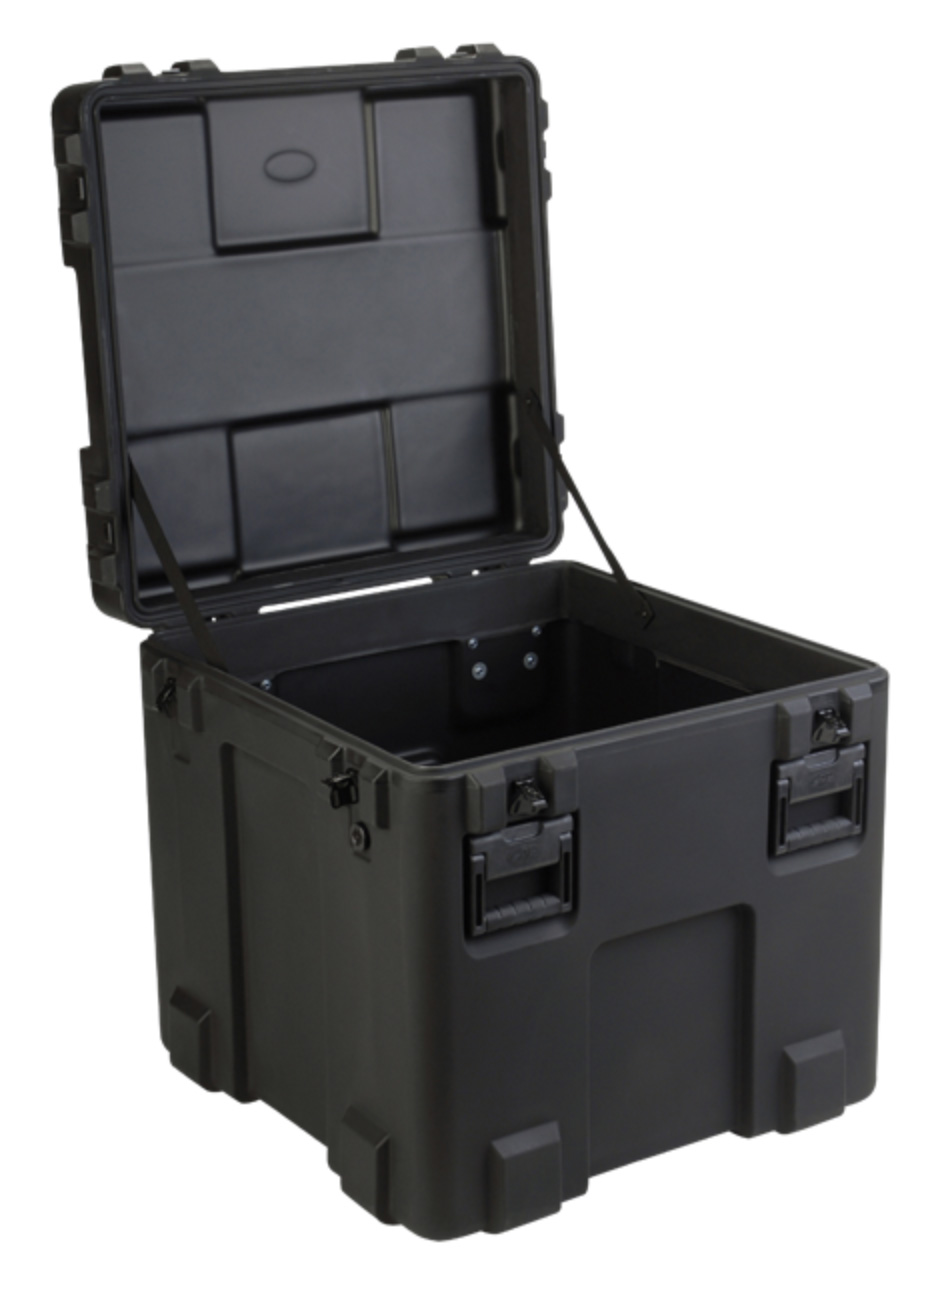 Here’s the SKB shipping case I’m using:
SKB R Series 2727-27 Waterproof Utility Case
https://www.skbcases.com/industrial/products/prod-detail.php?d=s18&id=333
I running some temperature and humidity tests right now--it’s very humid and around 86F/30C --so pretty warm. I also had this box out in the yard, closed up and latched all winter long, and temperatures regularly get down (and sometimes stay down) to well below zero F, around -20C.
So far so good on the temperature--as long as I cover with a reflective cover. My box temp sensor in the box has the humidity well below outside ambient, and the temps are maxing out around 82F/27-28C. That’s warm but destructive, and I wouldn’t be operating the mount at those temps.
Roll the video...
Posted May 29, 2020
First imaging run with N.I.N.A.
Last night I was out with the William Optics SpaceCat, CEM25P mount, and the ZWO ASI071MC color camera to run some analysis on guiding, which hasn't been excellent lately--trying to determine the cause, but also to try out some new astronomy control software: N.I.N.A., which stands for Nighttime Imaging 'N' Astronomy. It's free, open source software that has interested me for several months. Find it here: https://nighttime-imaging.eu/ I first downloaded it last October and did some daytime testing, connecting cameras and a mount, but I haven't been back to it until yesterday. I like and regularly use both Sequence Generator Pro with ASCOM on Windows, and Ekos/KStars with INDI on linux. Both work equally well, with advantages and disadvantages, with features I like and don't. The framing and mosaic wizard in SGP is unbeatable. I like the guiding process built into Ekos way more than PHD2, along with the extreme portability and performance you get with INDI/KStars/Ekos on a Raspberry Pi 4 SMB. They are fantastic apps, worth checking out to see what works for you and your setup. Some may point out that SGP has a price tag, but at only $99 US, I would still put it in the same "basically free" category as Ekos.
NINA certainly has my attention after last night's imaging run (I installed version 1.10 BETA007, which ran beautifully). I have been using SGP and Ekos for years, and for the most part they are solid working applications that have delivered quality imaging, automation, and equipment control. Of course--like everyone, I have also experienced dozens of wasted clear nights because software didn't function correctly, drivers failed, intermittent hardware issues, voltage and current issues. Maybe that's just part of engaging in a technical hobby like astronomy and astrophotography. You learn to troubleshoot weird problems in the dark, half-asleep and staggering out to your gear in the early morning hours. But it's when you see a nebula or galaxy appear in the SGP or Ekos or NINA image window after a five-minute exposure, that makes it fun, and maybe solving those problems seems worth it. Usually.
NINA, like SGP, is a Windows app and sits on top of ASCOM protocols and hardware specific integrations, so if SGP works with your cameras, mount, focusers, filter wheels, etc., chances are NINA will also work.
And NINA really shines with its modern design, intuitive system workflow, and noticeably quick processing speeds when imaging, focusing, and plate solving. There's some brilliant application design built into NINA at the foundation, in the way it allows a new user to experiment, to just try something, click the autofocus button without the sense that you won't be able to find your way back if it goes sideways. Many Windows apps are designed with a very structured user path that guides you toward completing a milestone or reaching a given endpoint with no way to stop and go back before you get there. On the other hand, NINA seems to have been designed with almost continuous access to all the equipment tabs, configuration options, immediate saves for configuration changes, even when other processes are running.
 NINA is also a complex app that provides a complete astro imaging, planning, and automation workflow, and I found myself jumping around to different tabs and panels, looking for things throughout the night. I quickly found just about everything I was looking for. At some point last night I was thinking I should be able to make tweaks to a sequence while it's running--like you do with SGP, but that wasn't a serious issue since it only took a moment to stop, edit, and restart the sequence. I struggled a bit with autofocus, but I didn't spend any time configuring or calibrating it--and that would be the same with any astro app.
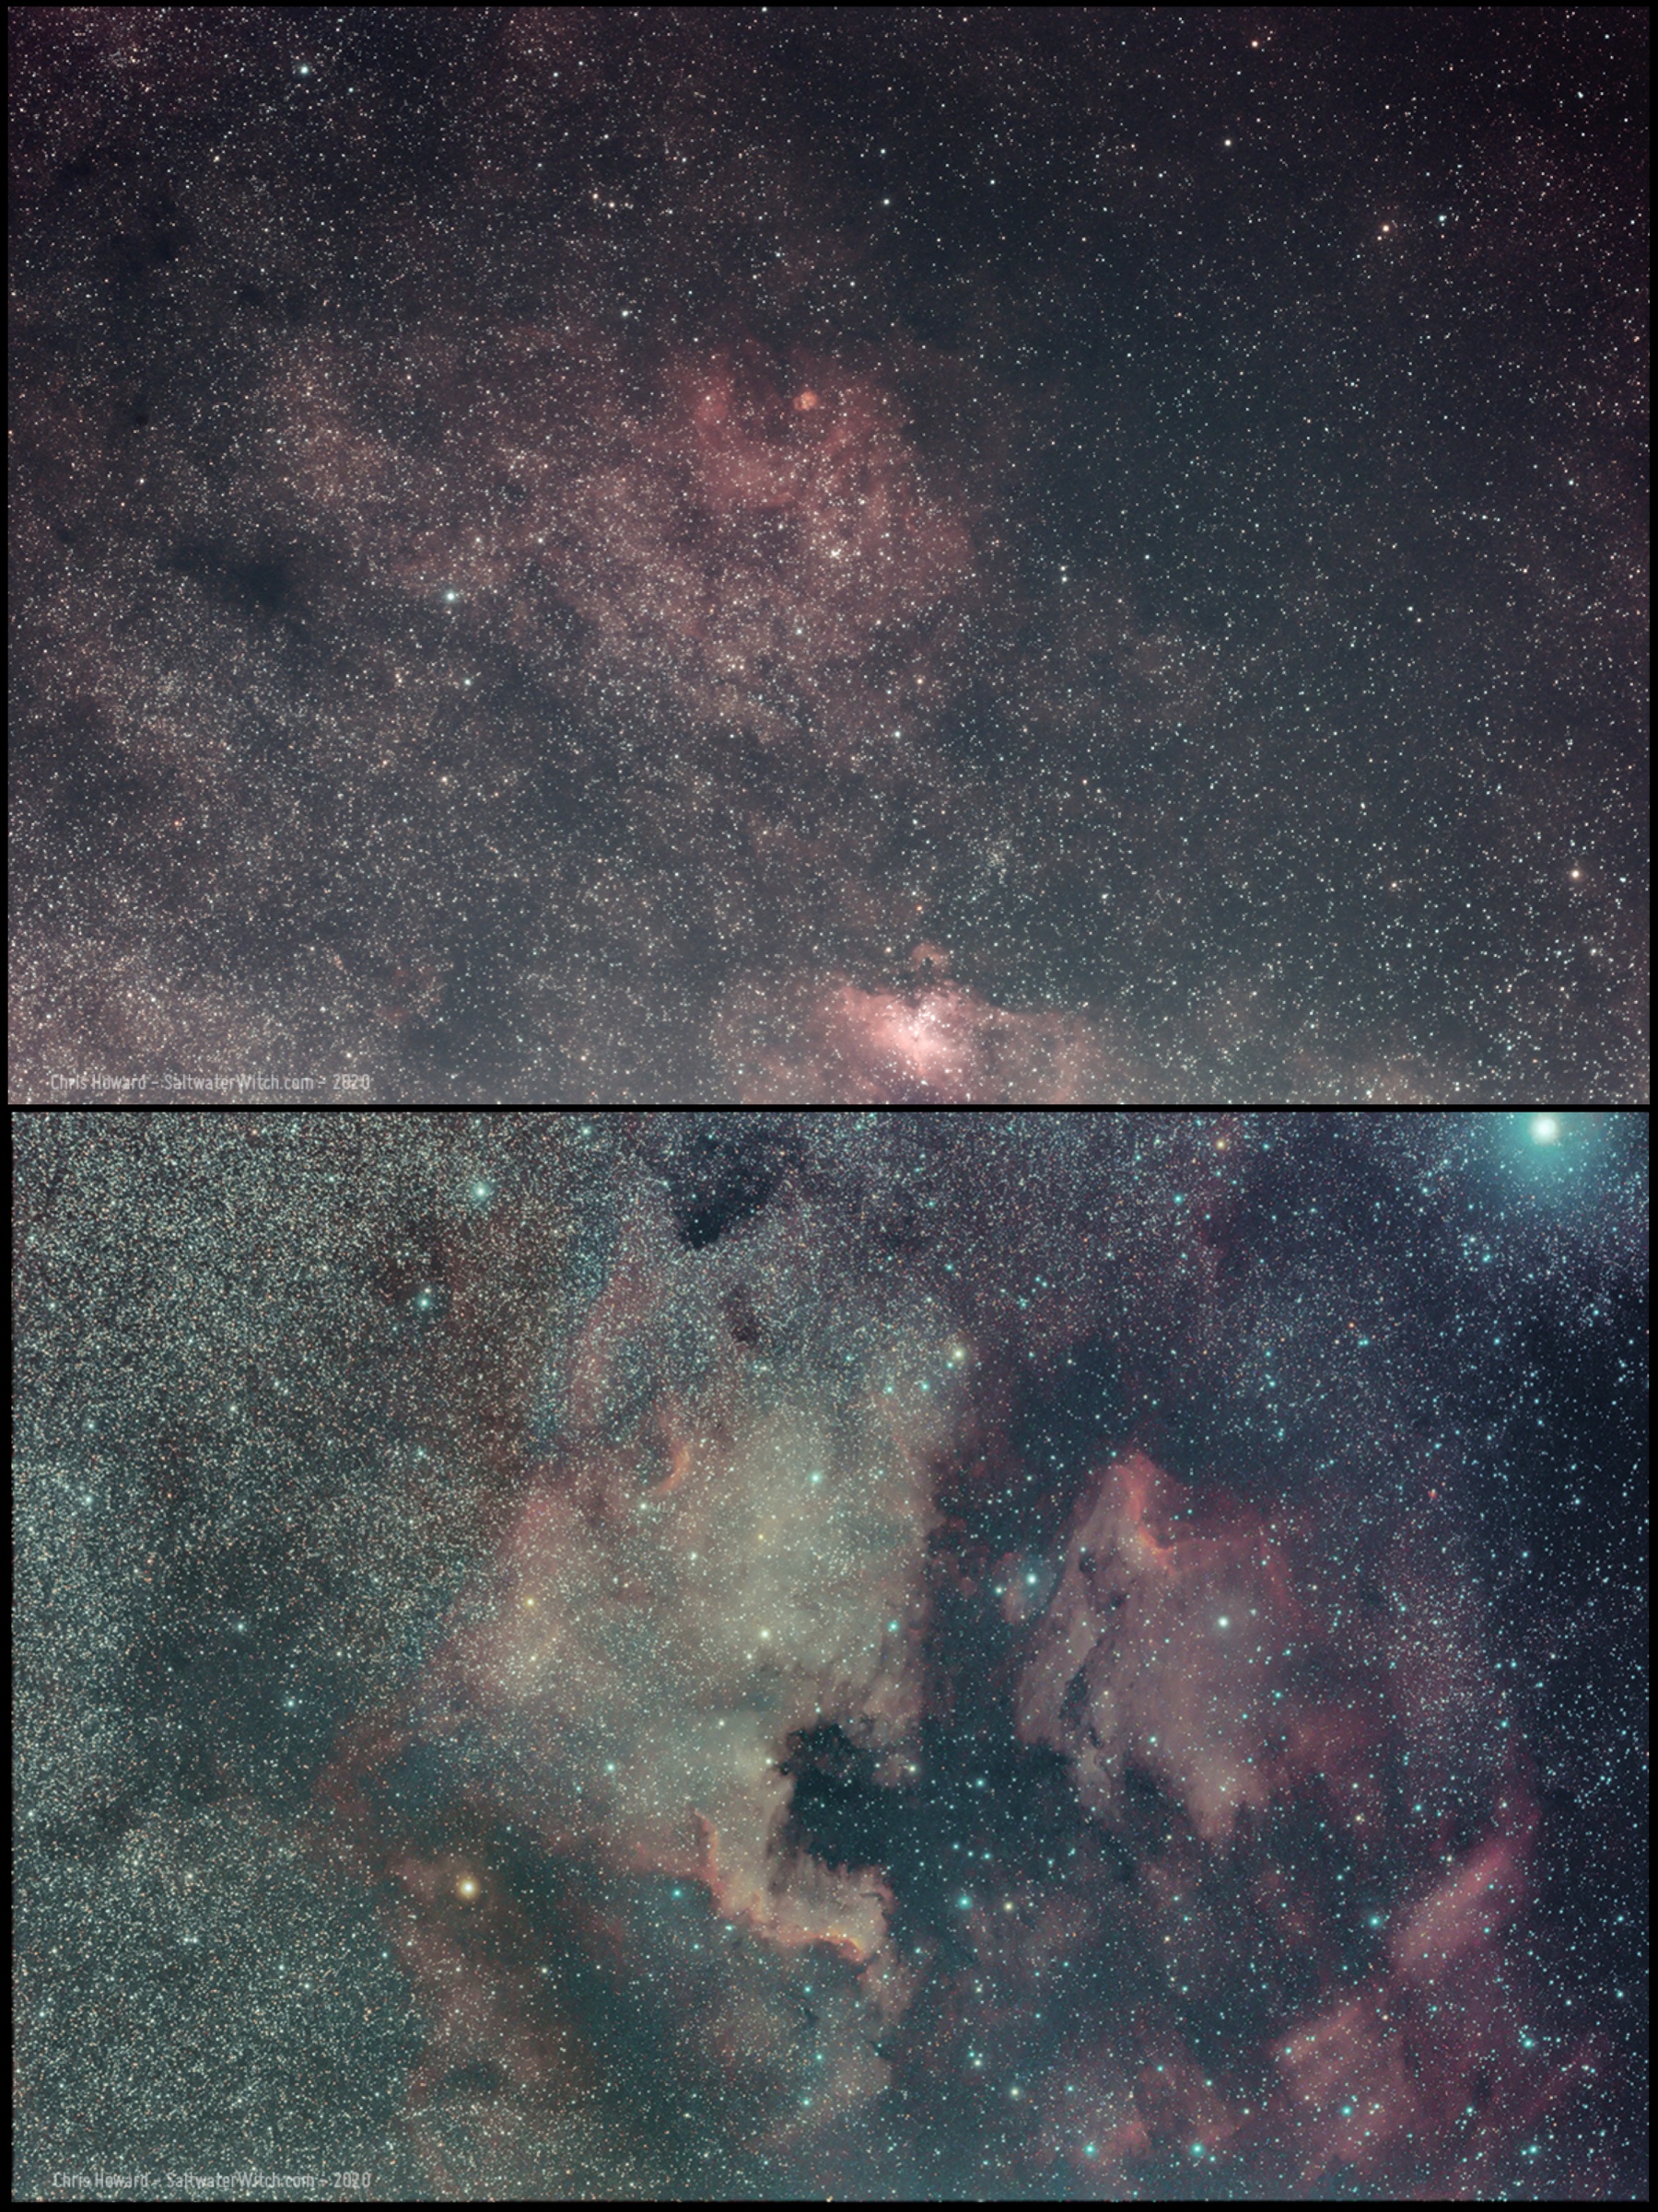
Here are a couple stacked test shots from last night, reasonably processed in PSCC2020. Top centered is NGC 6604 open star cluster in Serpens, and Sh2-54 (GUM 84) is that bright block of ionized hydrogen just above center. That's Messier 16, Eagle Nebula going out of frame at the bottom. The second image is NGC 7000 North America Nebula, with the Pelican to the right of it across that gulf of dark dust and nebulosity. That's the blue supergiant, Deneb in the upper right corner, the brightest star in Cygnus, and 19th brightest in the night sky from our point of view. 20 x 240 second subs, no calibration for each target. For M13 I shot 200 x 30 second subs, and no cal frames.
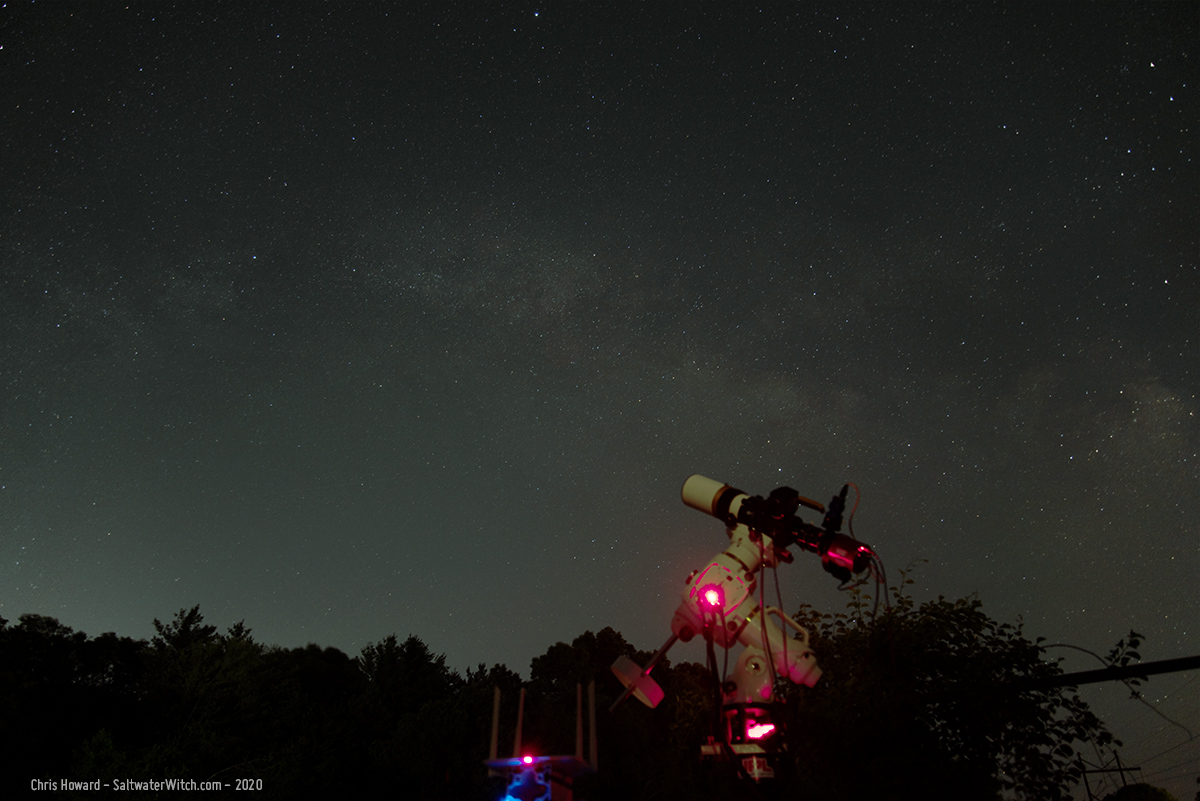
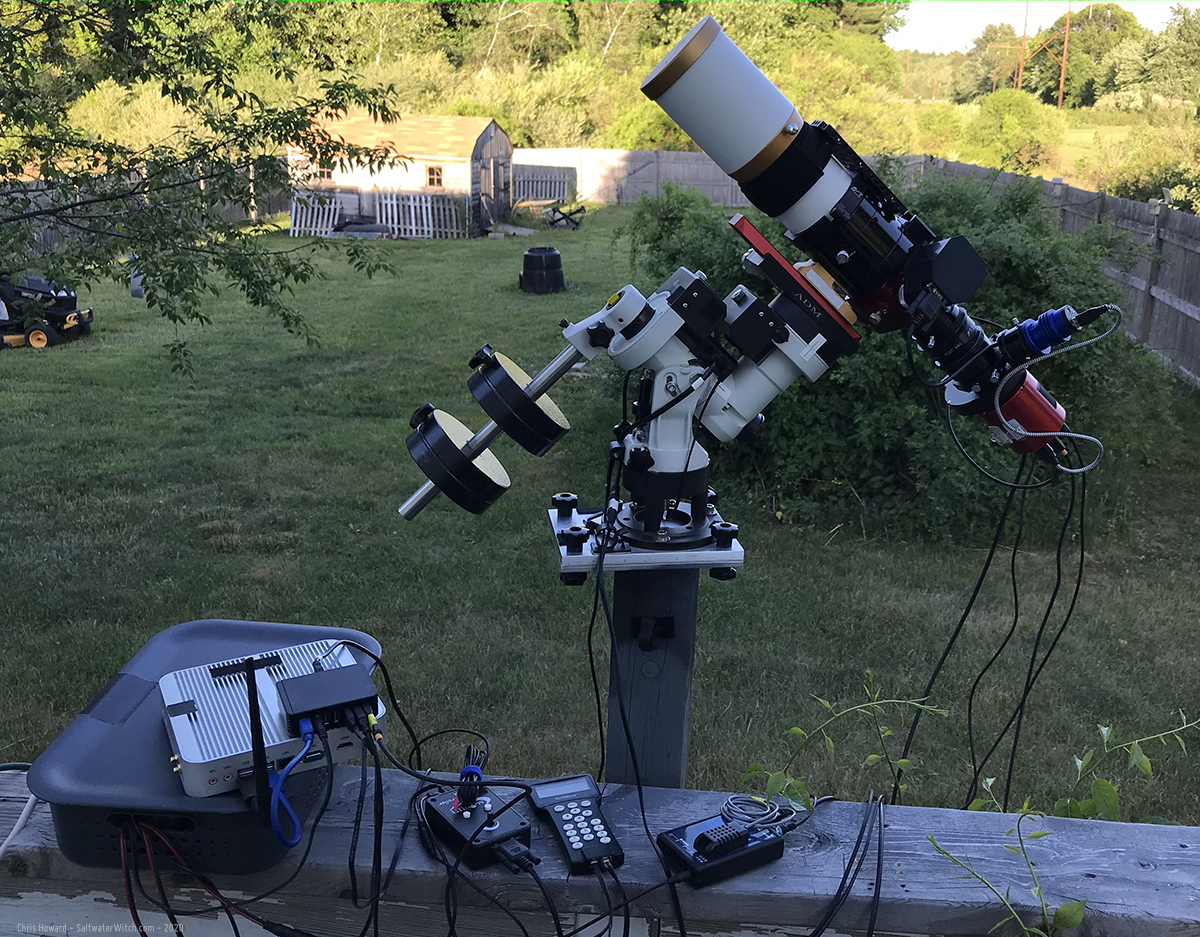
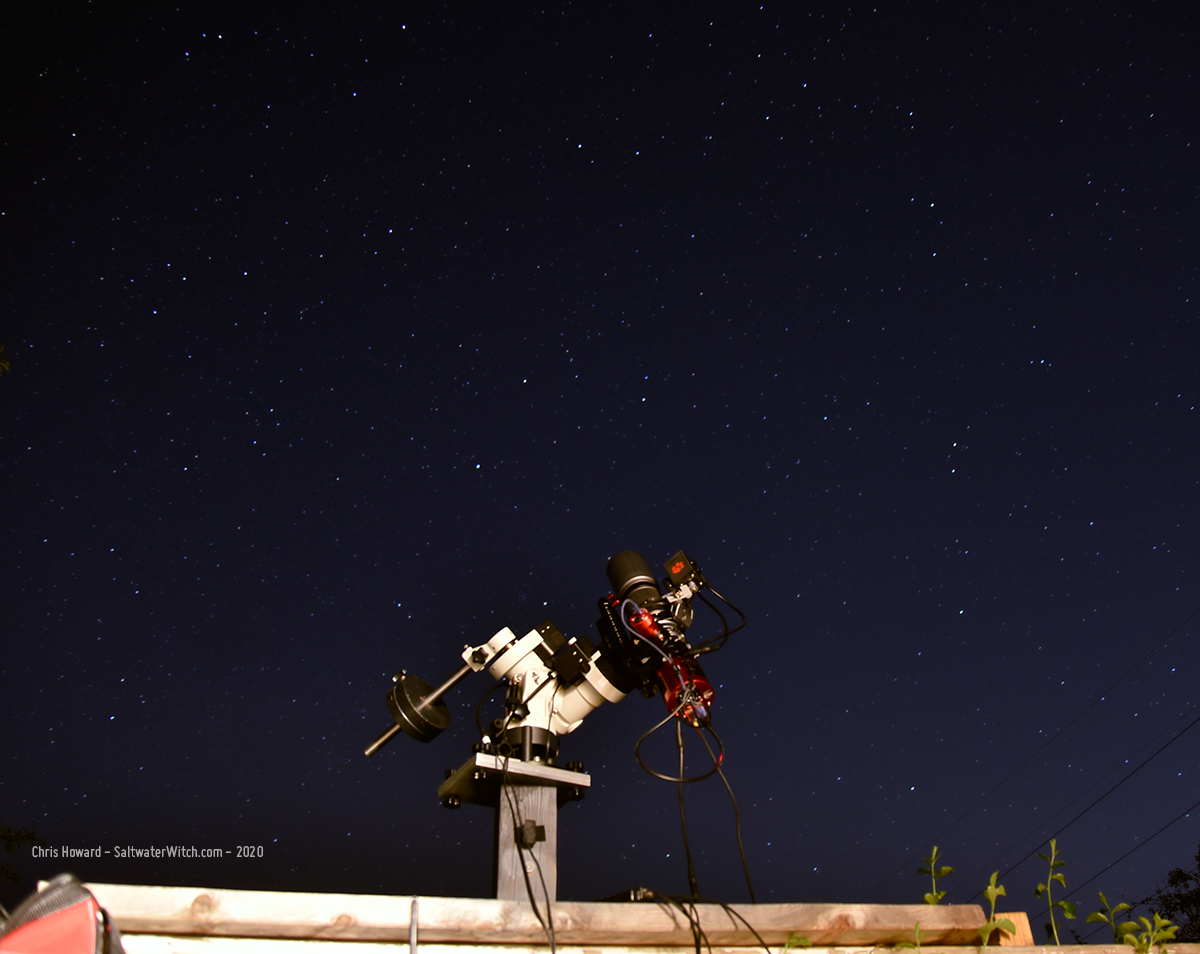
Another couple from last night--first is my setup for the night, and in this shot I'm actually in the middle of a 200-sub exposure sequence of M13, image below.
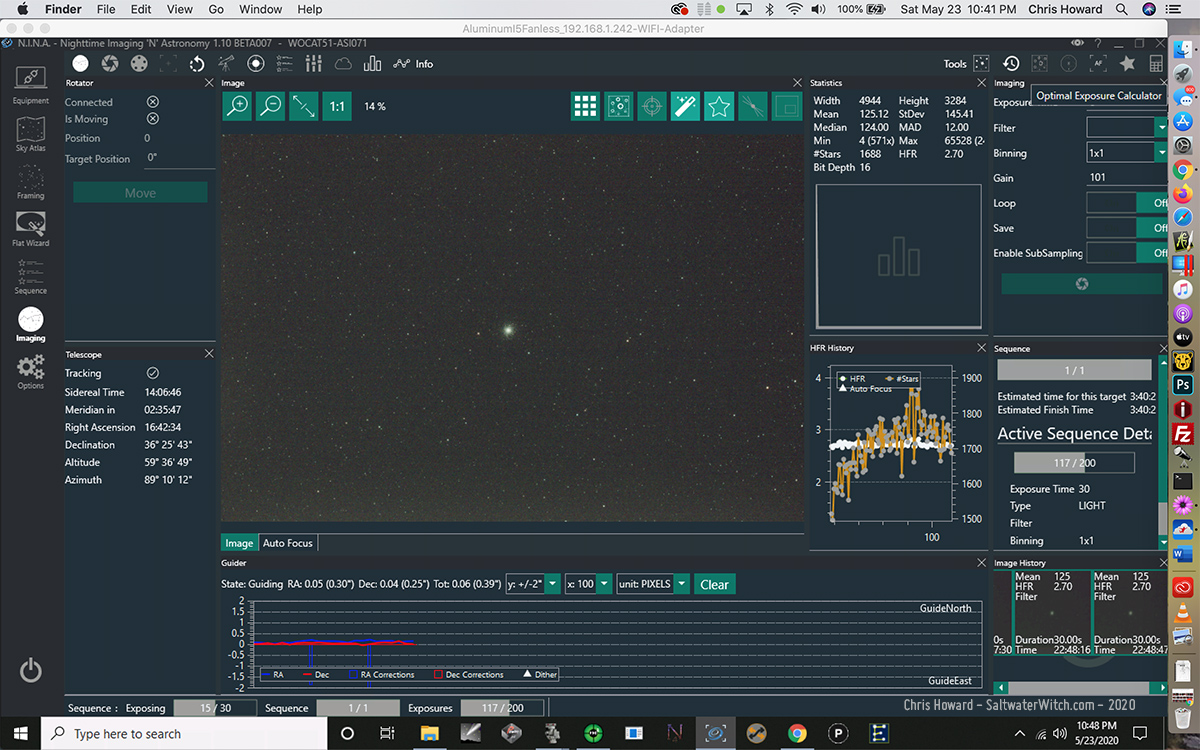
Screenshot of the N.I.N.A. UI during the M13 imaging run:
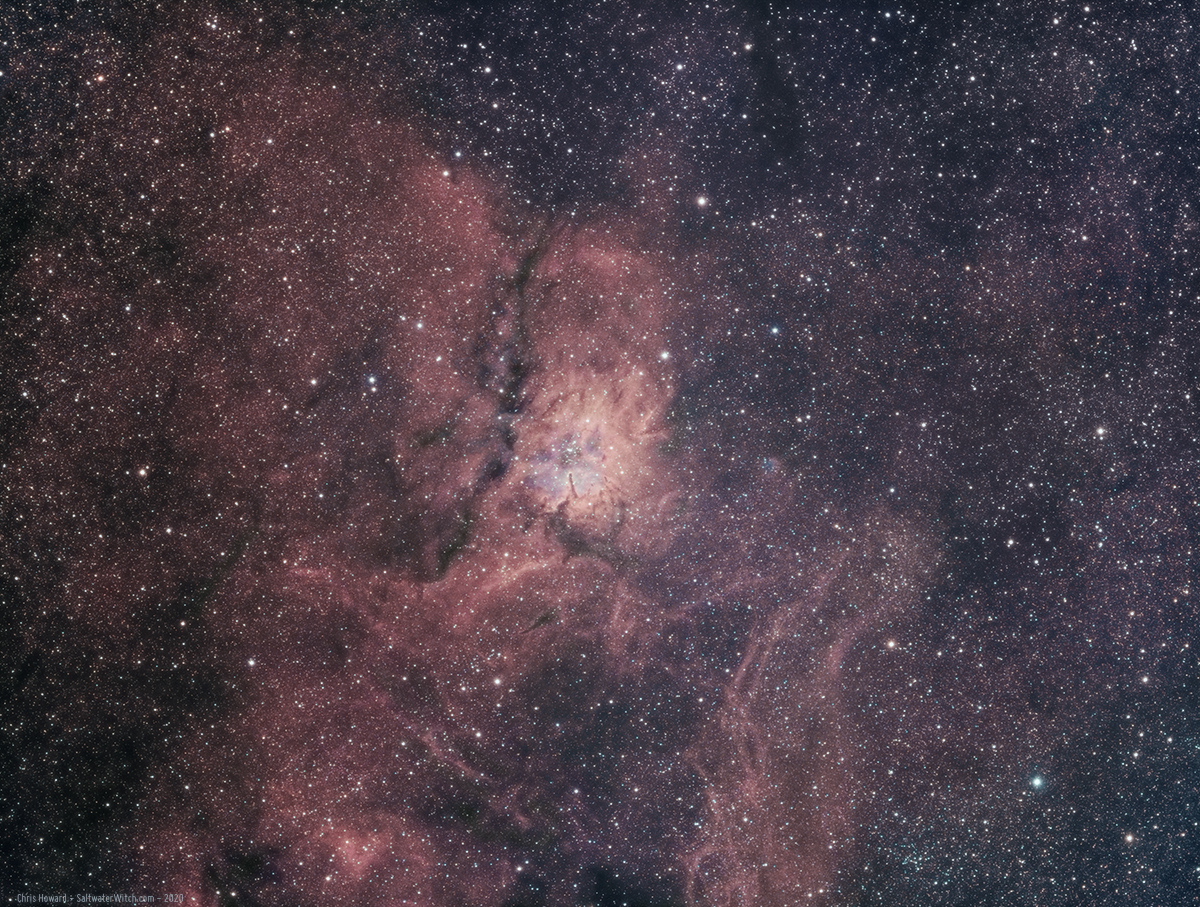
Posted May 24, 2020
NGC 6820 in HaOIII
Another one from the one clear night we've had for a while--Wednesday the 13th. This is centered on the reflection nebula NGC 6820 (that bright nebula core) and the open star cluster NGC 6823 in the constellation Vulpecula. All of this is wrapped in the emission nebula, Sh 2-86, basically everything else in the frame, all the cloudy structures that surround NGC 6820 and 23. Reading the wikipedia page, it says NGC 6823, the star cluster in the center, "forms the core of the Vulpecula OB1 stellar association". It's true: https://en.wikipedia.org/wiki/Vulpecula_OB1 --that sounds very Star Federation, which is cool. Astro Notes: William Optics SpaceCat 51 250mm fl Apo Refractor, ZWO ASI1600MM-Pro cooled monochrome camera, iOptron CEM25P EQ mount, Astronomik 6nm Ha and OIII filters. 20 x 480 second exposures for each filter.
Posted May 15, 2020
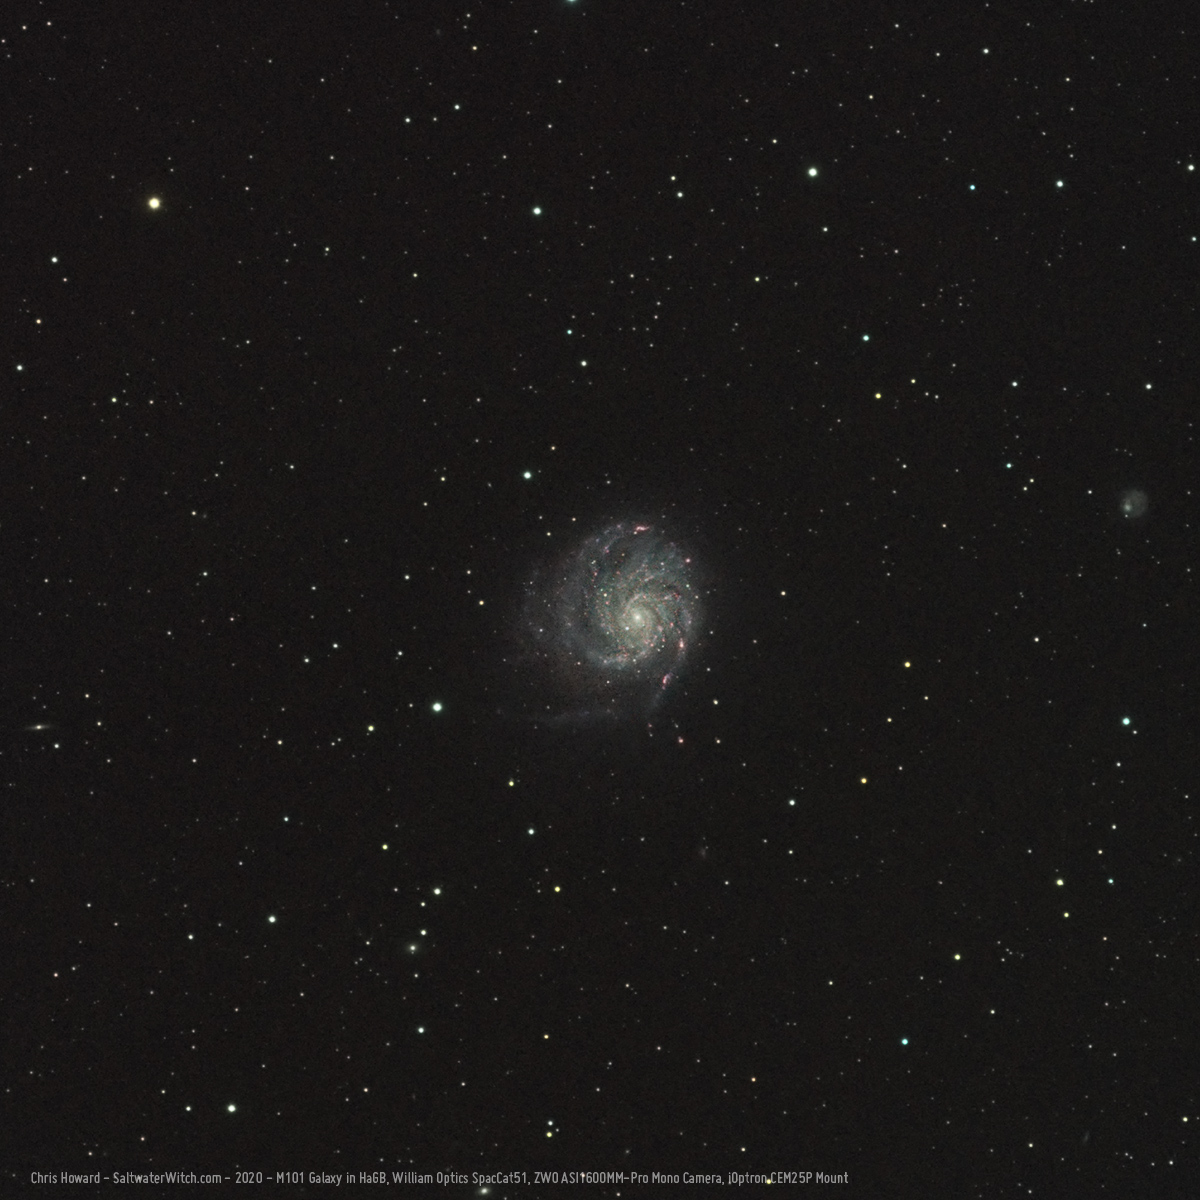
The Pinwheel Galaxy in HaGB (no red filter)
The Pinwheel Galaxy (M101) could be our galaxy's giant cousin--very distant cousin, since it's 21 million lightyears away (that's like 6 megaparsecss to you serious astro nerds). It's almost twice the diameter of the Milky Way galaxy, with a trillion stars. But what also makes the Pinwheel so wonderful is the way it's angled, so that we see it from the top (or face?).
I shot this in three sets of images, first with hydrogen-alpha, then with broadband green and blue filters, so instead of a normal red filter, I'm using narrowband Ha, which only allows a fraction of the hydrogen bandpass through--on the red end of the spectrum. I know HaRGB is popular, using the stacked Ha frames for a luminosity layer, but I only have five slots in the filter wheel, and thought I'd give this a try. (My filter order: Ha, OIII, SII, Green, Blue).
Here's M101 in HaGB mapped to RGB color, so that the galaxy's massive H II regions (pink and red masses swirling along the Pinwheel's spiral arms) really stand out. If I shot this in normal broadband red, these would just blend into the overall color of the galaxy. Astro Notes: William Optics SpaceCat 51 250mm fl Apo Refractor, ZWO ASI1600MM-Pro cooled monochrome camera, iOptron CEM25P EQ mount, Astronomik 6nm Ha filter, Baader Green and Blue filters.
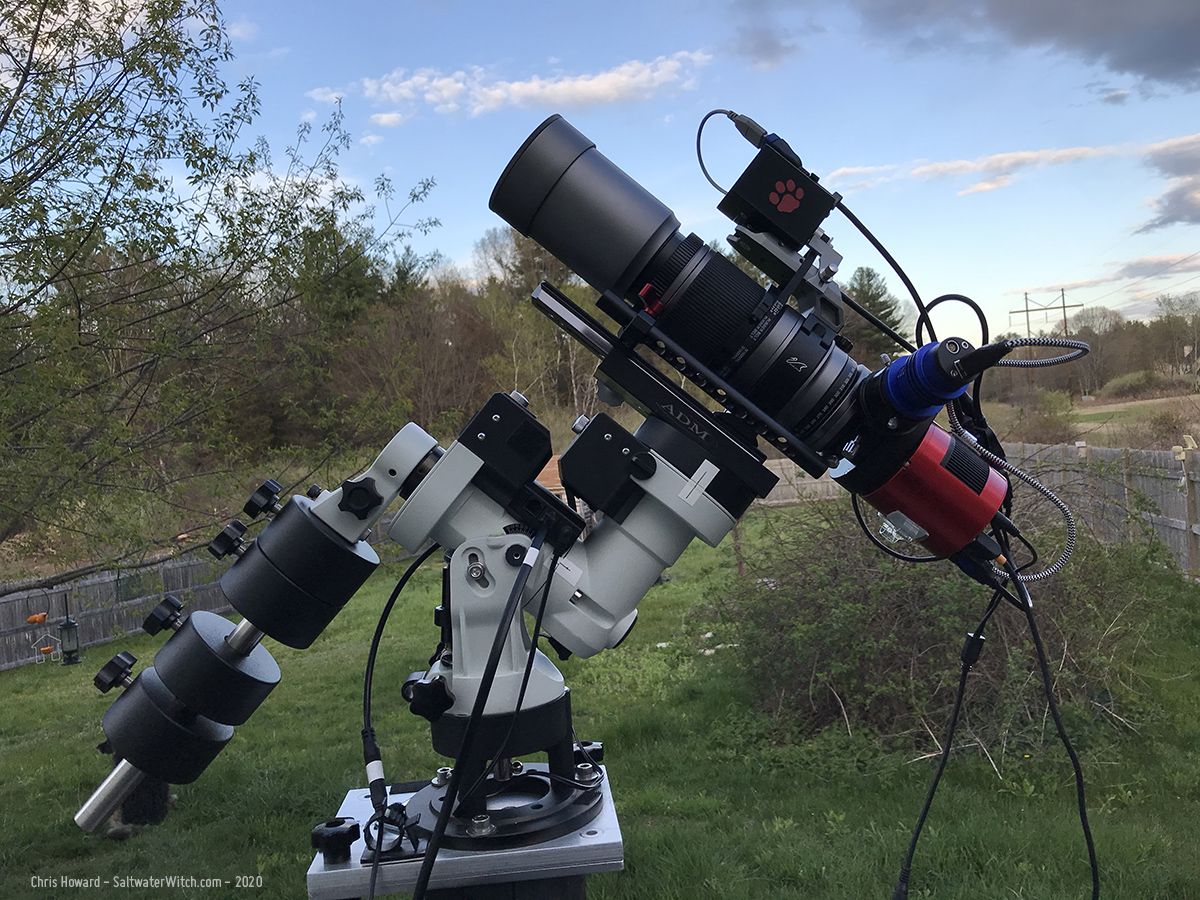
I shot the 60 sub-exposures that make up this image (20 subs for each filter) with everything you see here:
Posted May 14, 2020
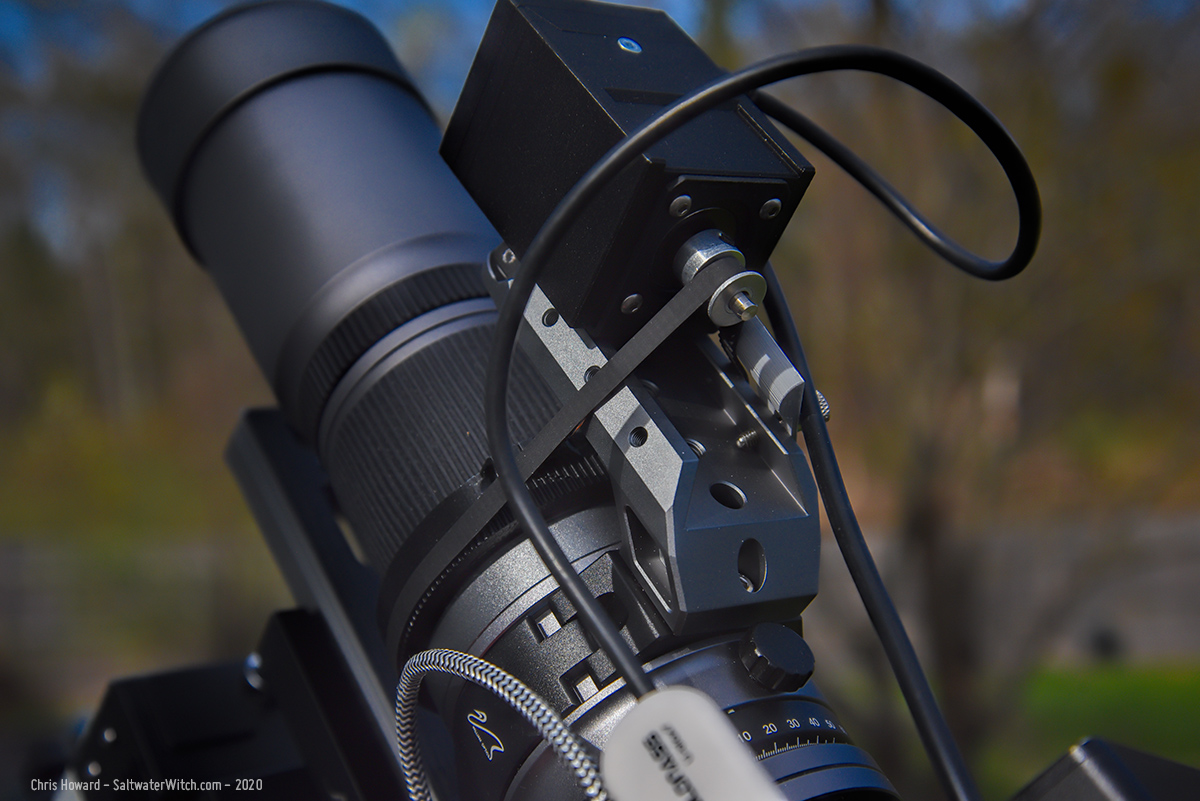
SpaceCat 51 Autofocus
Another autofocuser configuration I'm trying out with the William Optics SpaceCat51 and the Deep Sky Dad AF3 stepper and focus ring. The goal is portability, and I have the motor and controller bolted to a guide-scope shoe that can be easily added or removed from the scope. I 3D printed a tension adjustment bracket--that's the gray half-cylinder piece on the opposite side of the handle.